 Wood bead garlands have been a trending decor element for the past year and their popularity continues to soar amongst decorators and bloggers alike. Here, we are sharing our own DIY to help you create your own custom garland! It’s fun for the whole family and adding the polymer clay element really gets the kiddos involved. Who doesn’t love clay? To get started, here are the list of supplies you need:
It has so many great attachments and can be used for a million crafts and projects! (While you’re there, be sure to check out their MakerX blog to see more fun DIY’s!) 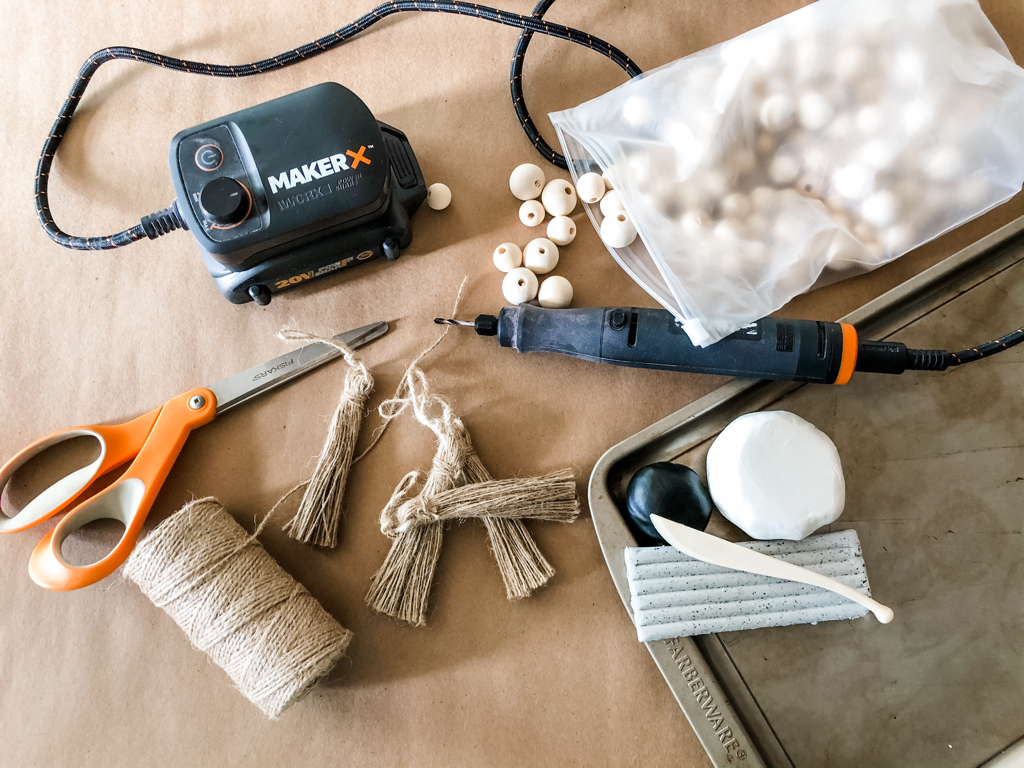 Wood Bead and Polymer Clay Garland DIY Step by Step Instructions:
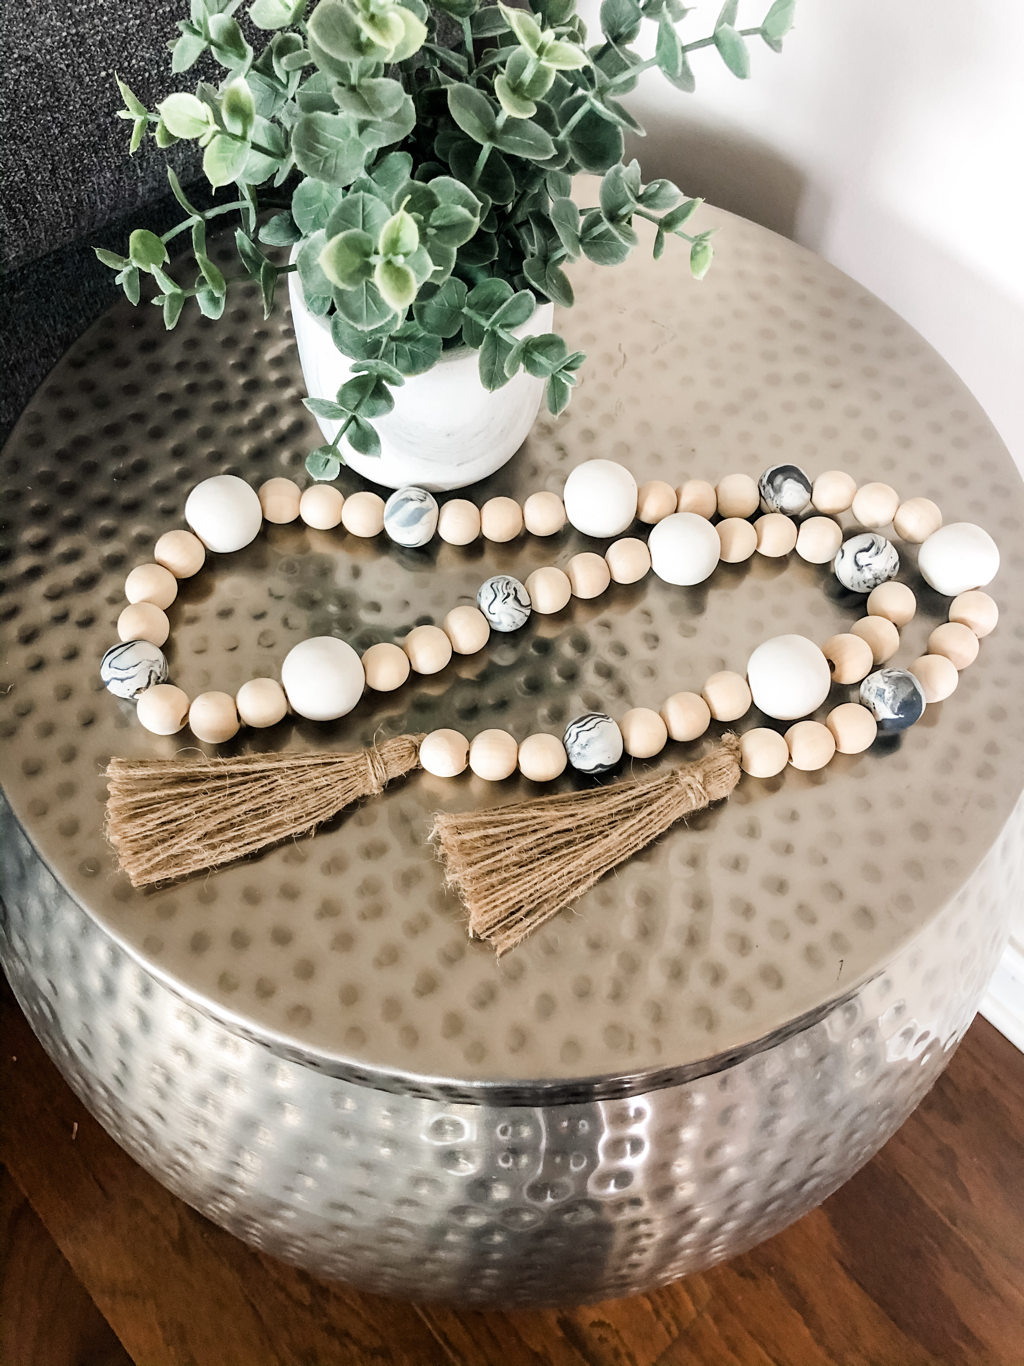
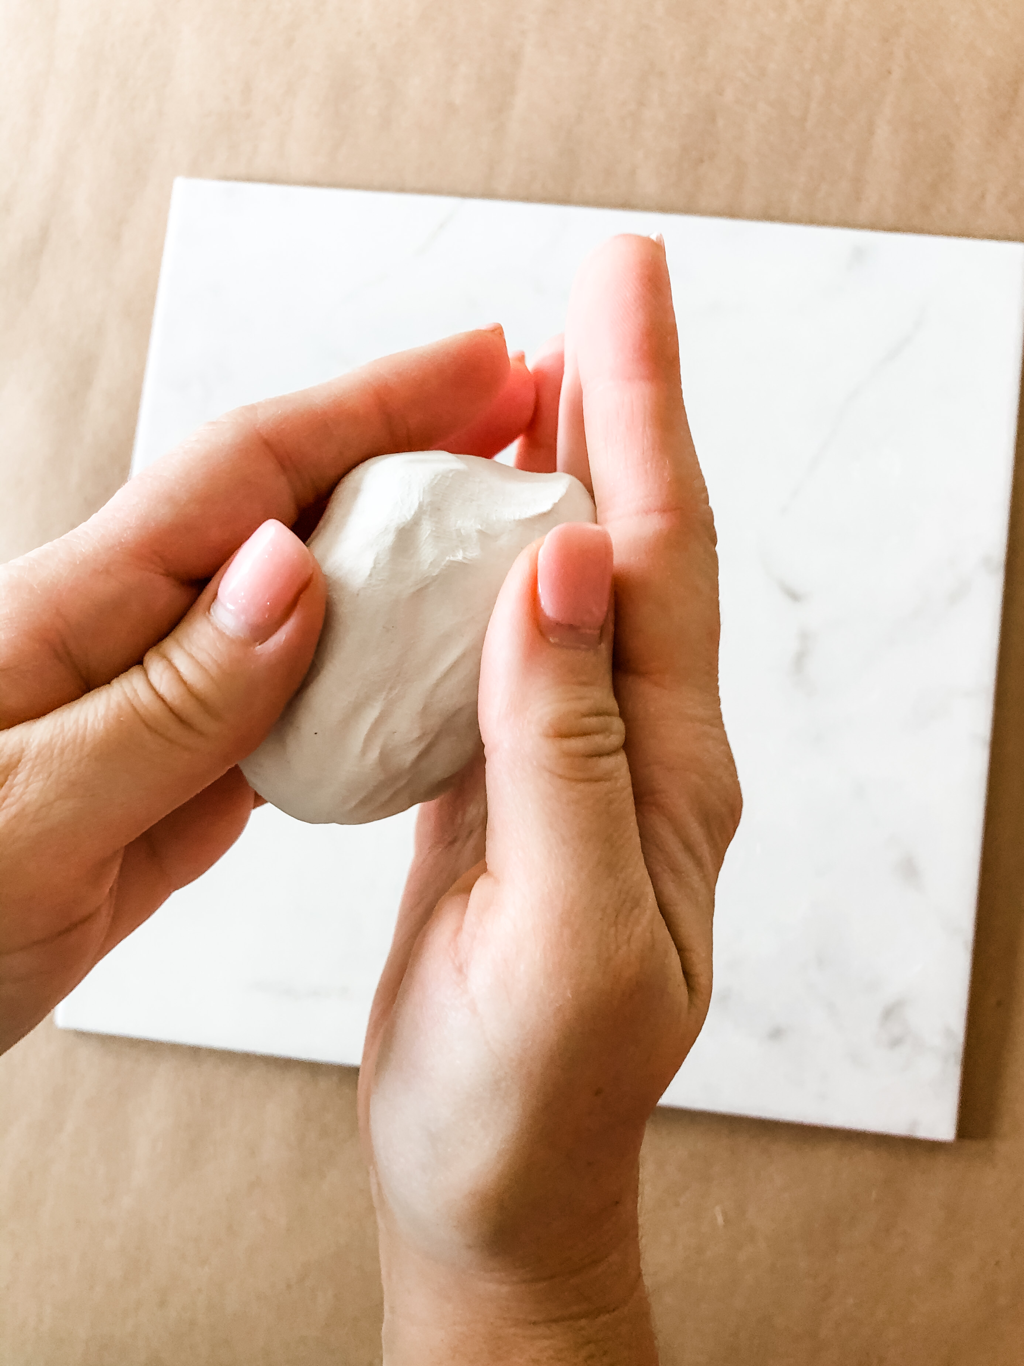 2. Roll the clay into “snakes” or logs until they are about a half inch thick. Feel free to combine colors for a marbled effect or just stick with a solid color for a more classic look. (We did one of each as an example) 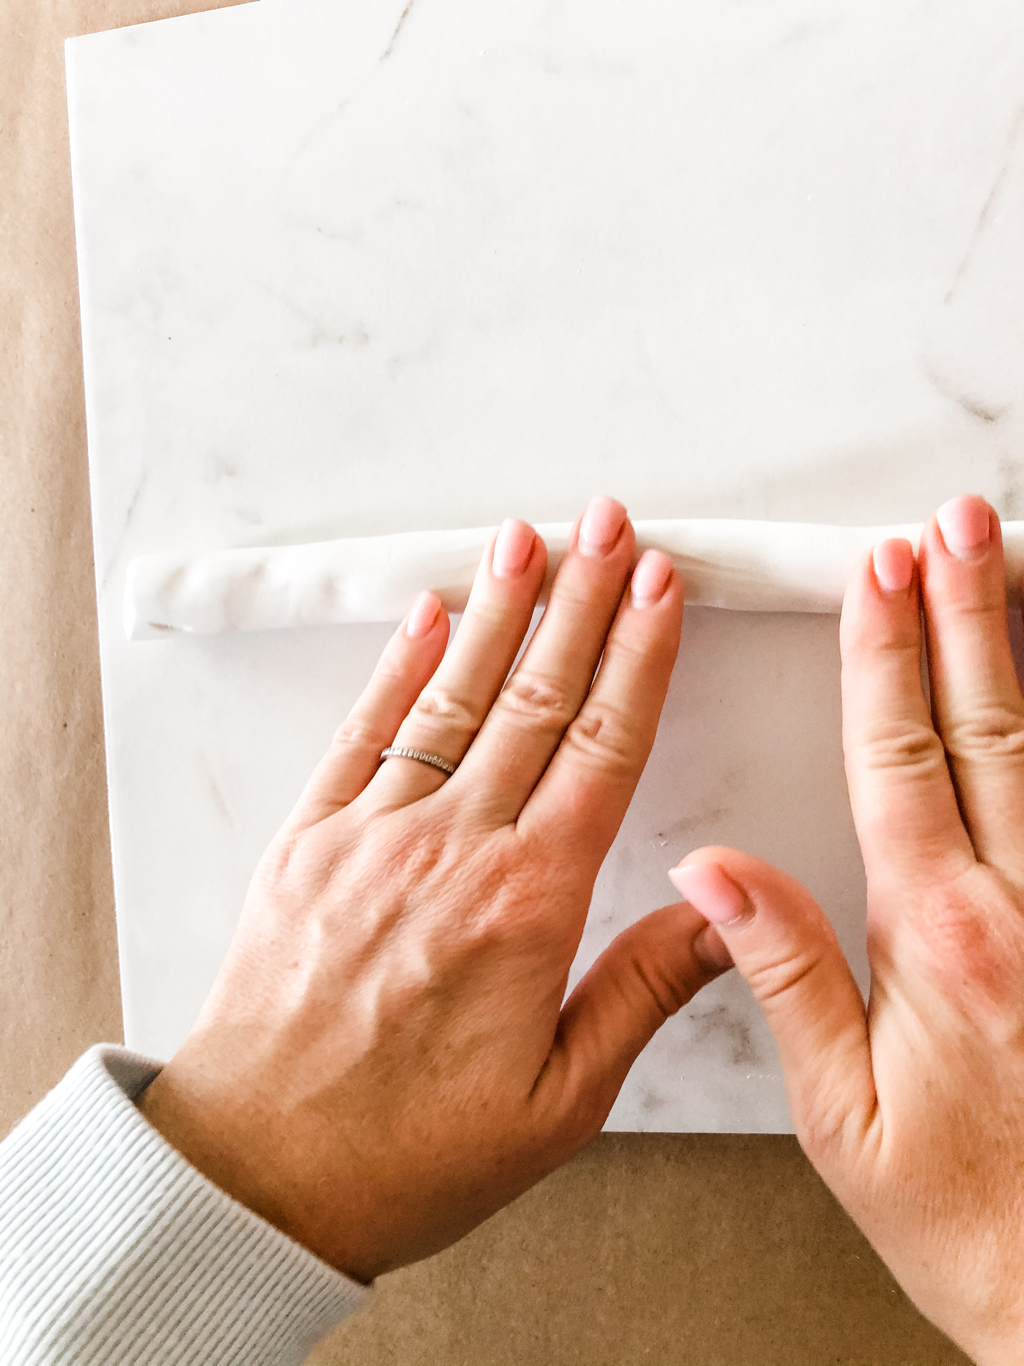 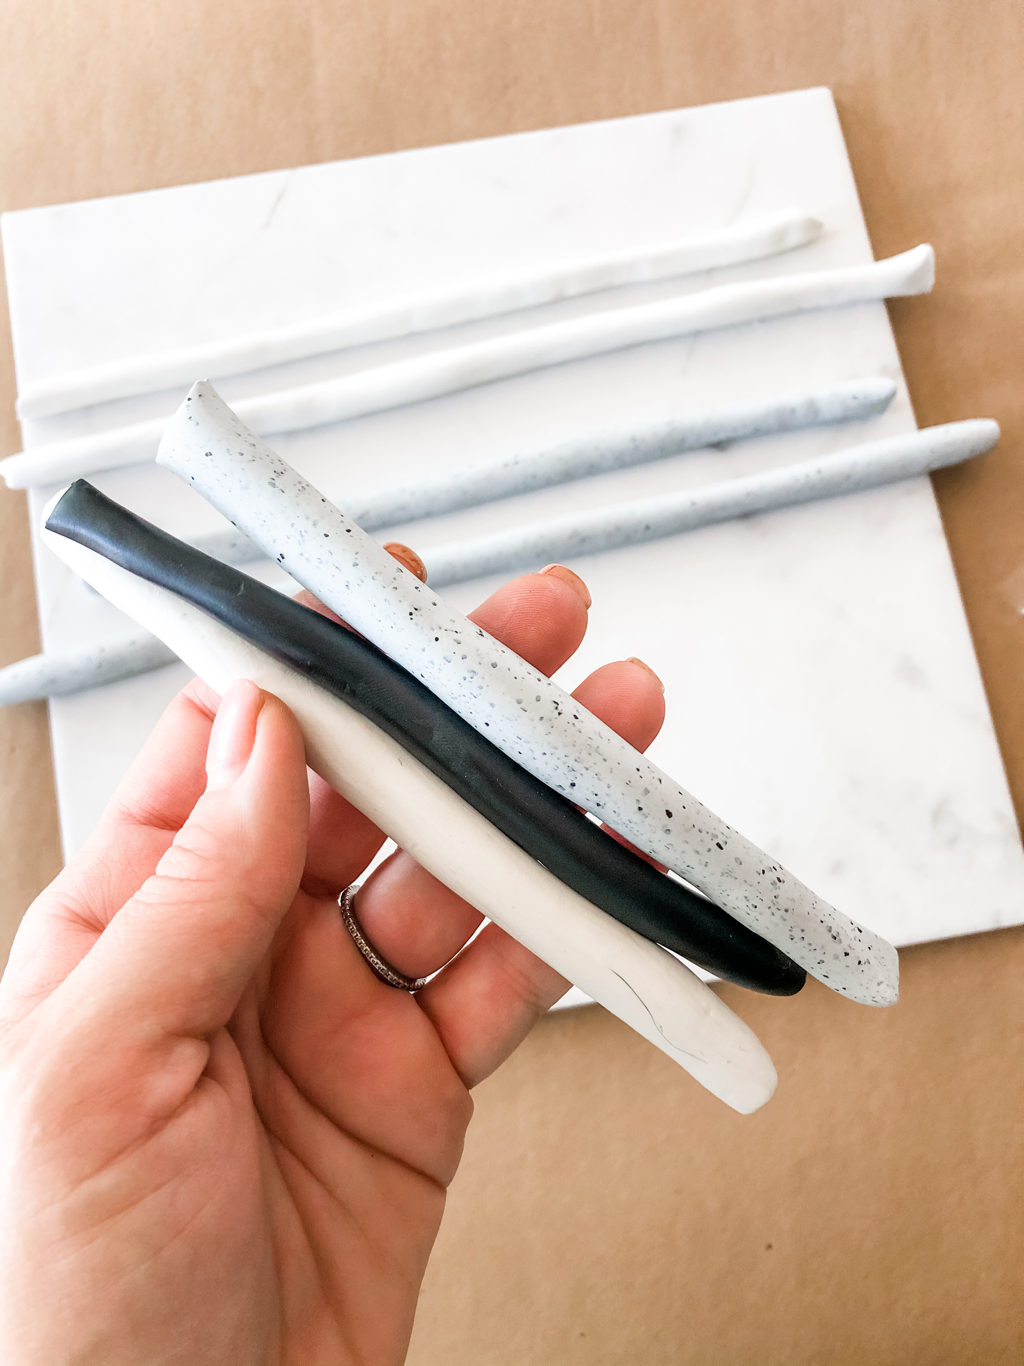 3. Lay each snake onto a cutting board or solid surface and cut into even sections. (this does not have to be exact, just eyeball it)  4. Roll each section into a ball with your hands. These will be your clay beads so mold until they feel as round as possible. (They should be about the same size as your wood beads. Slightly smaller or bigger will also work and add some dimension to your garland if desired.) 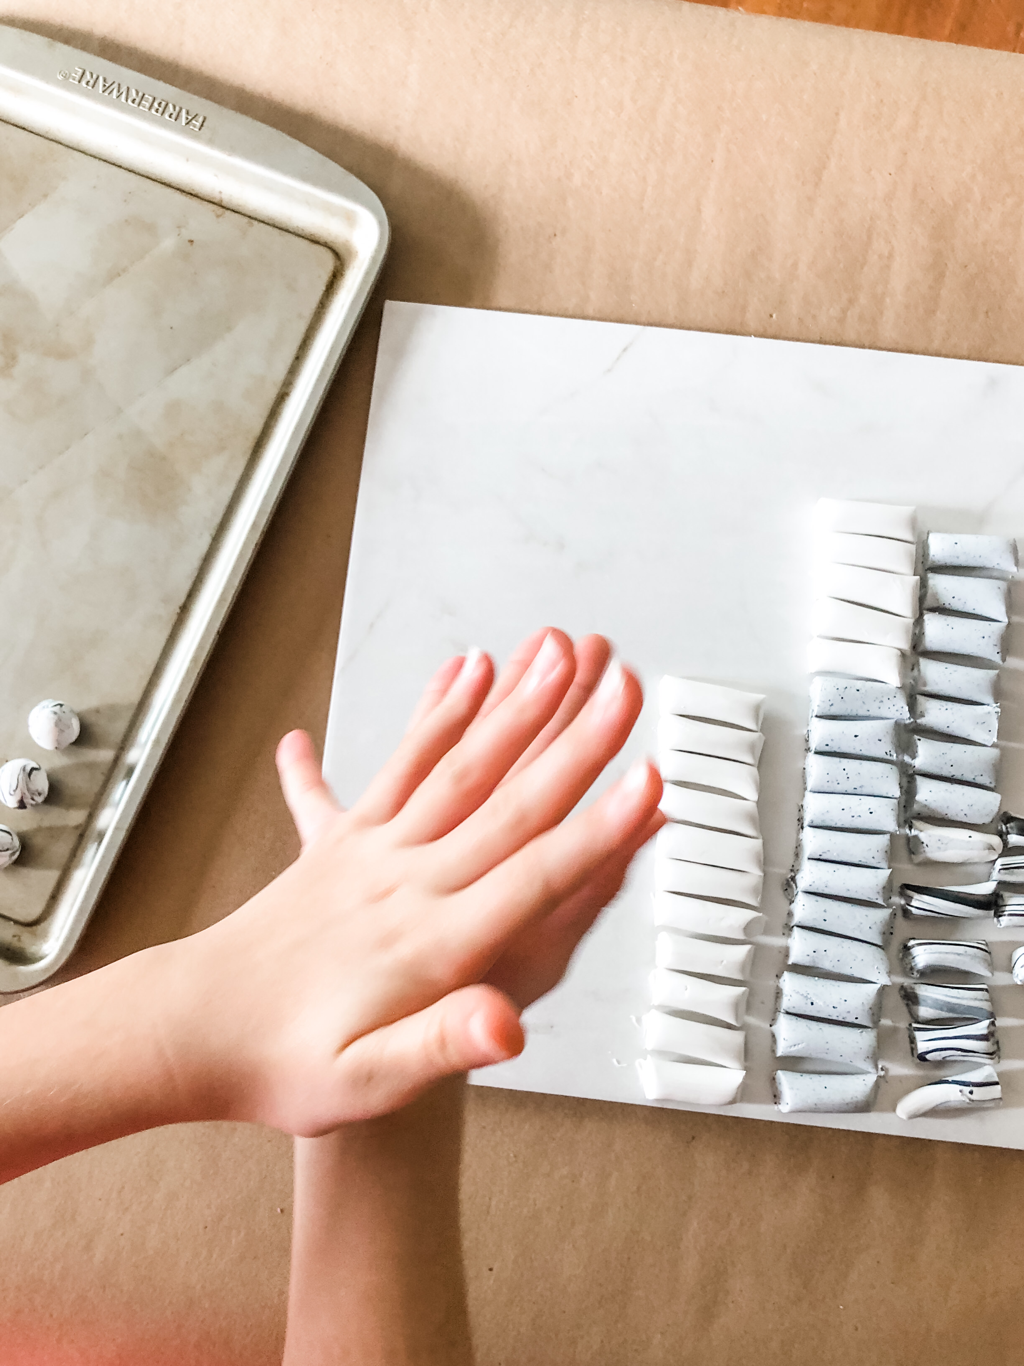 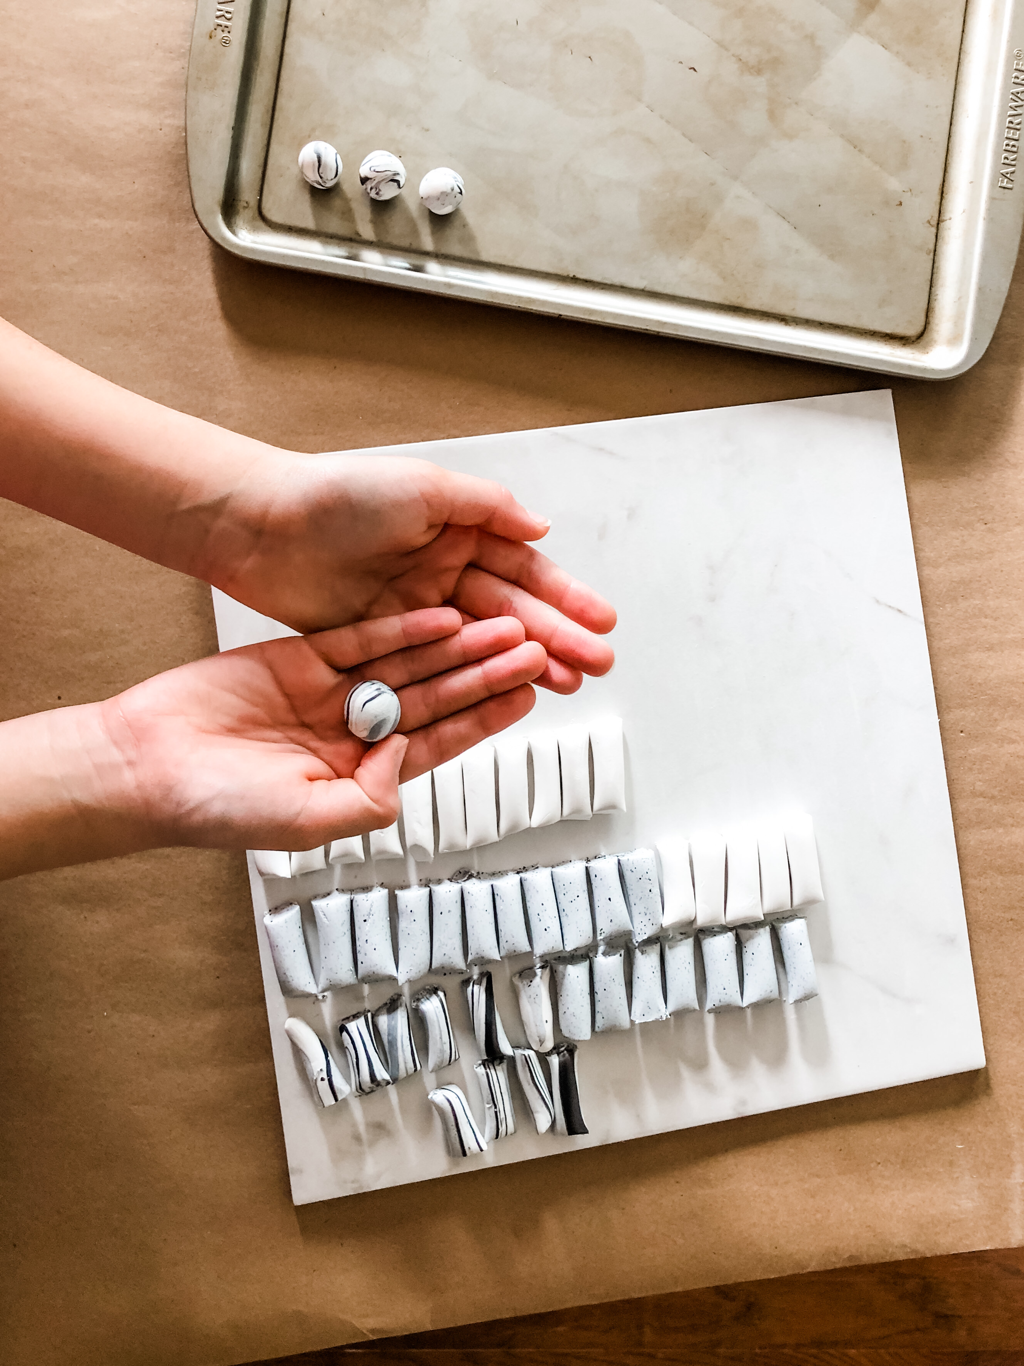 5. Place your clay “beads” onto a baking sheet and bake according to the package directions of your clay. (typically around 265 degrees for 15-30 min depending on the thickness of the clay) 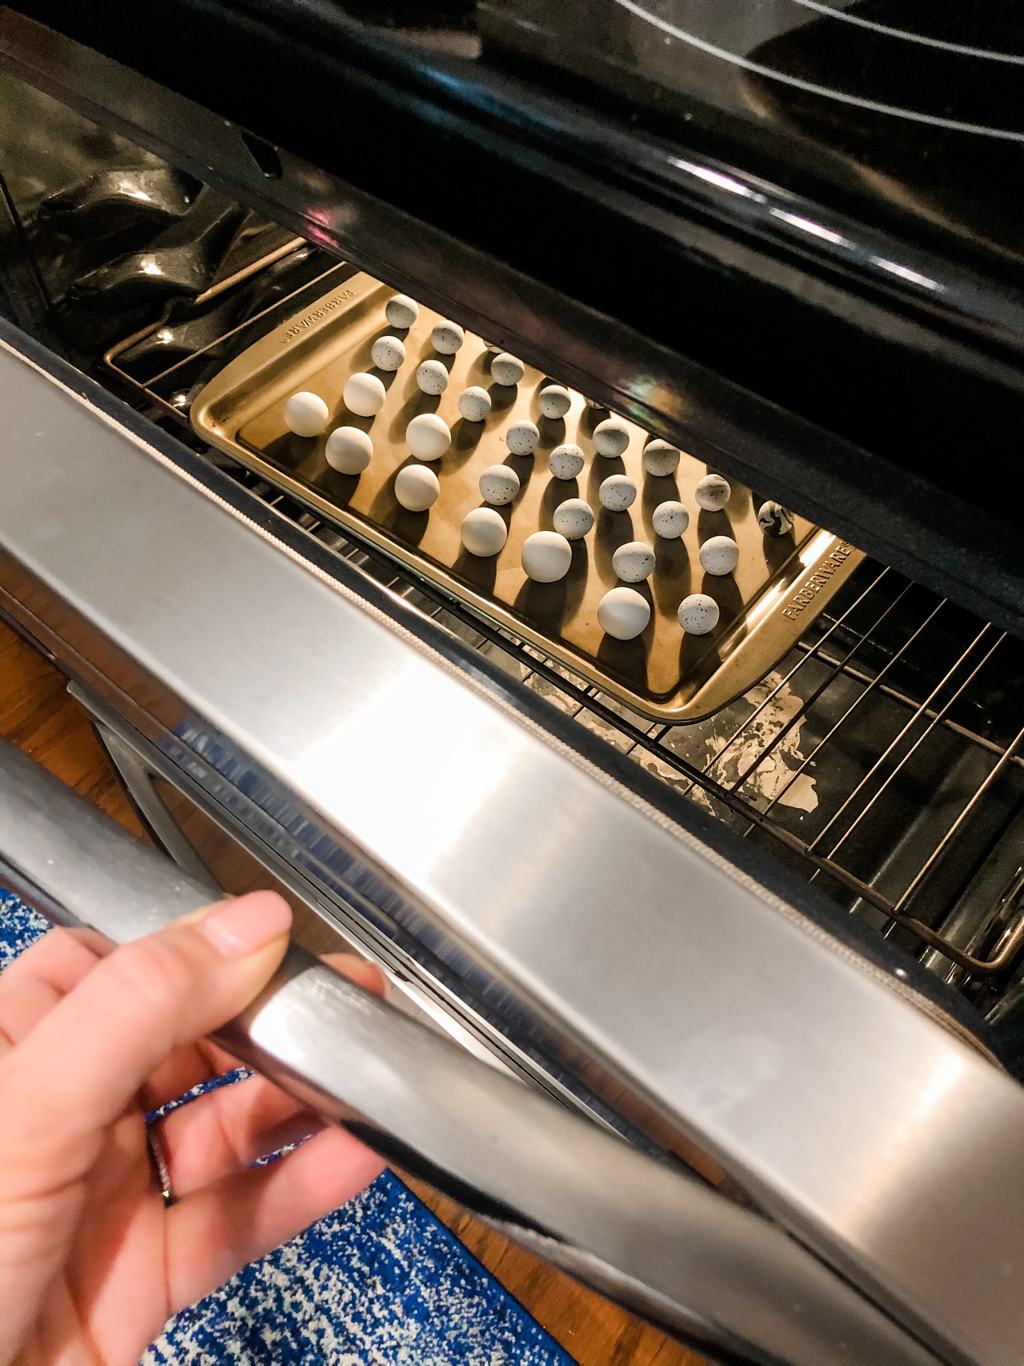 6. While the clay beads are baking, gather up the other supplies and lay them out on your work area. 7. Allow the clay beads to fully cool. 8. Power up your MakerX Rotary tool with the drill bit attachment and carefully drill holes into the clay beads. Be sure to do this on a safe surface to avoid damage. (A block of scrap wood works like a charm!) 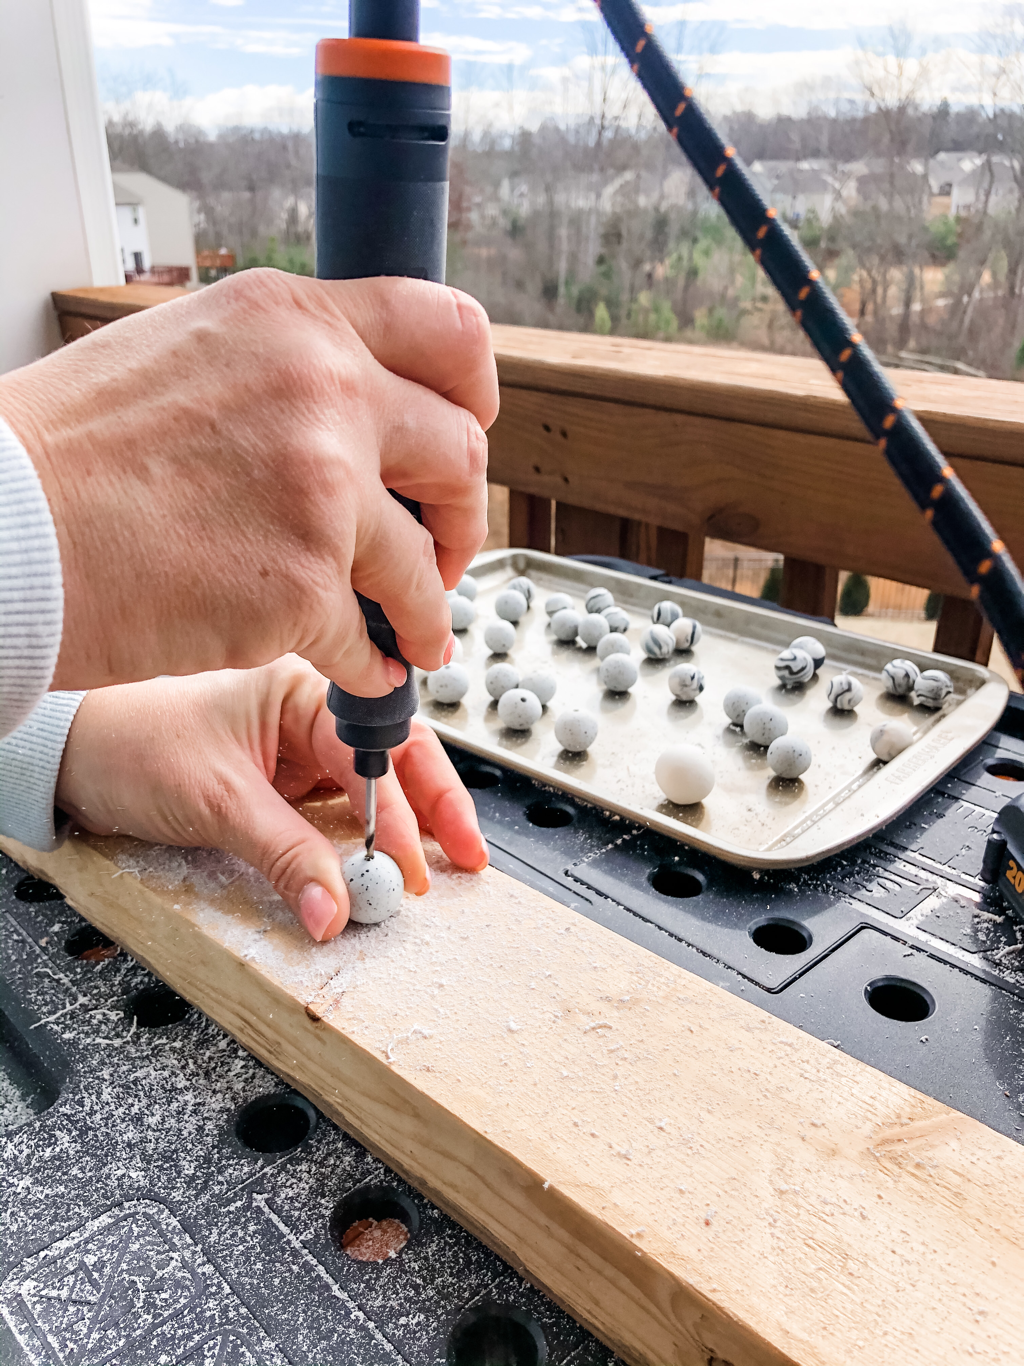 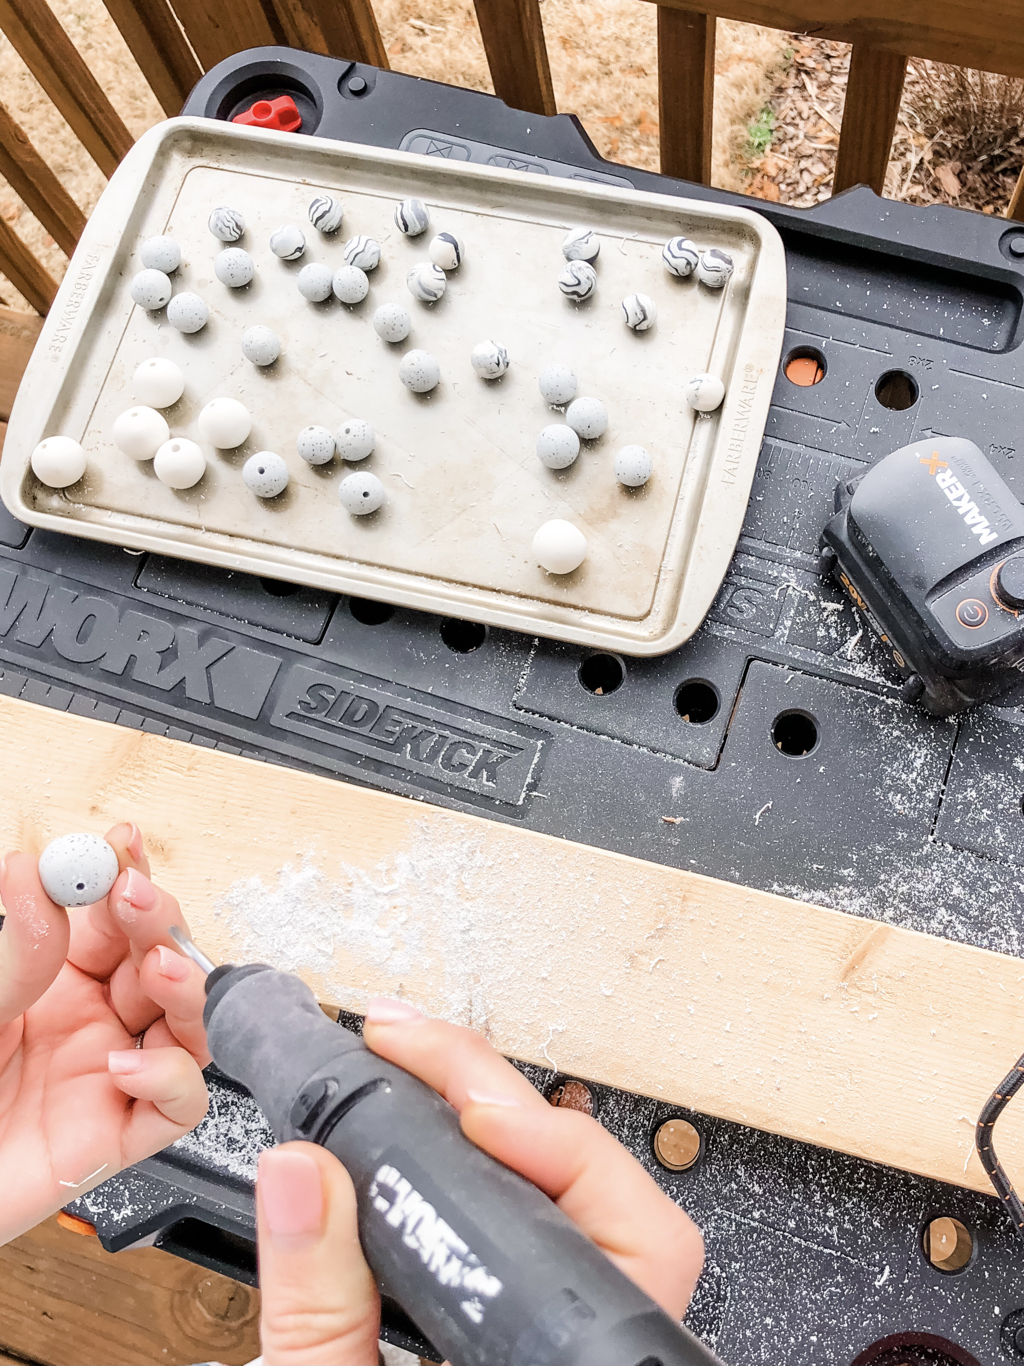 9. After all of your clay beads are drilled, decide on a pattern and length for your garland and string the beads leaving each end open.  10. Once the beads have been strung, tie a knot in each end of the garland big enough to secure the beads. 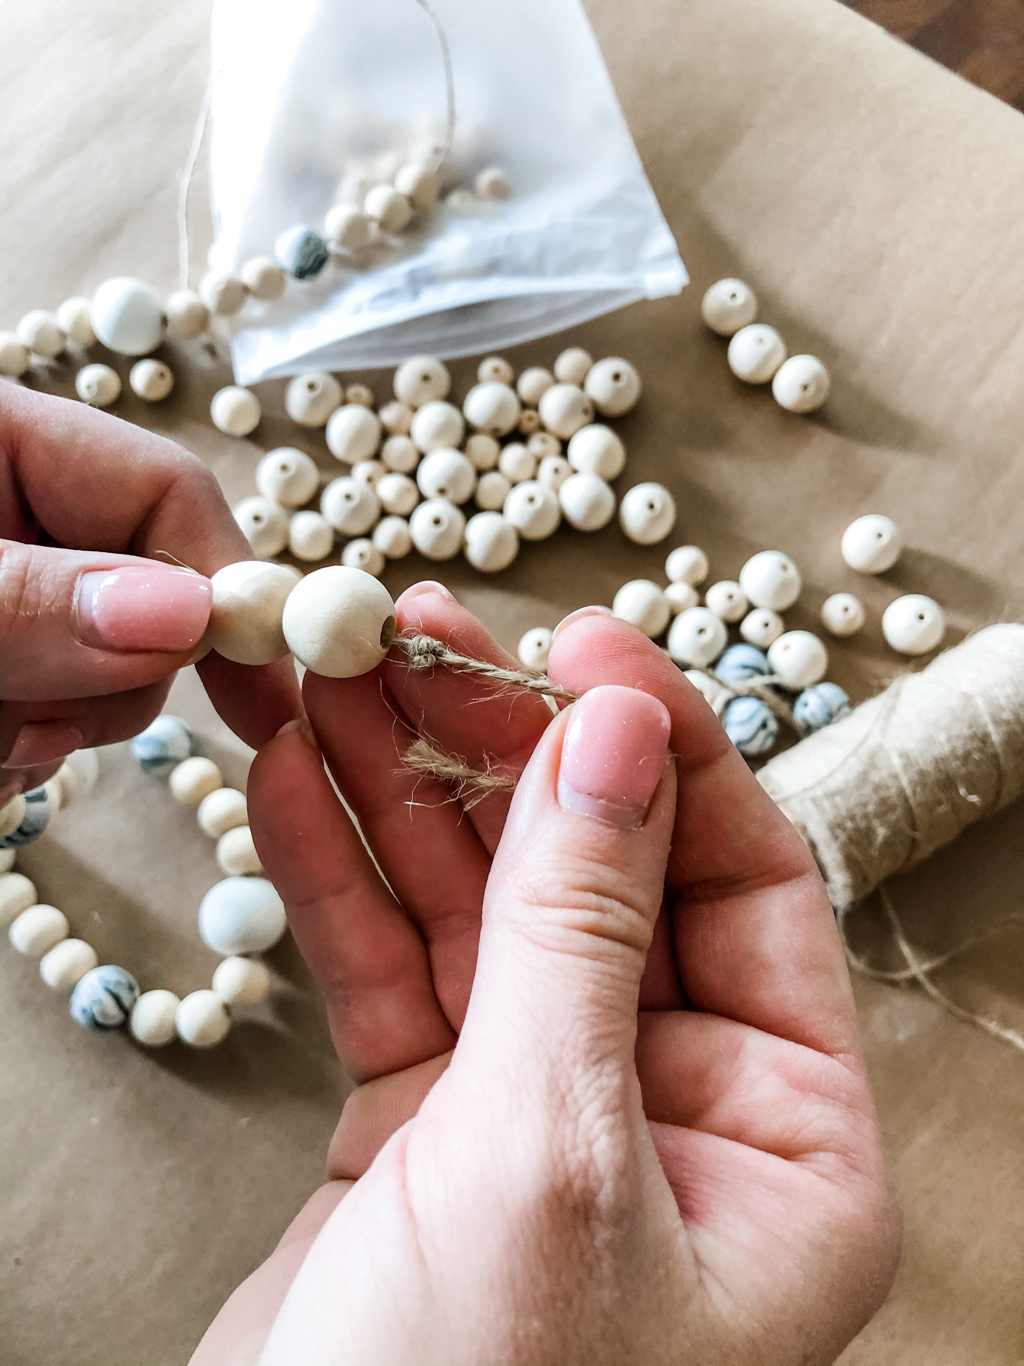 11. Now add the tassels to each end by tying them to the remaining twine. Trim any excess twine.   The garland is ready! All that's left to do is decide where to display it! Wood bead garlands add rustic farmhouse style to any decor. Try it on your mantle or tablescape, or on a bookshelf or built-ins. The options are truly endless!
Happy Crafting!!! If you try this tutorial, share your work with us by tagging @vansstrands_handmade on Instagram! Can’t wait to see your creations! XO Vans
1 Comment
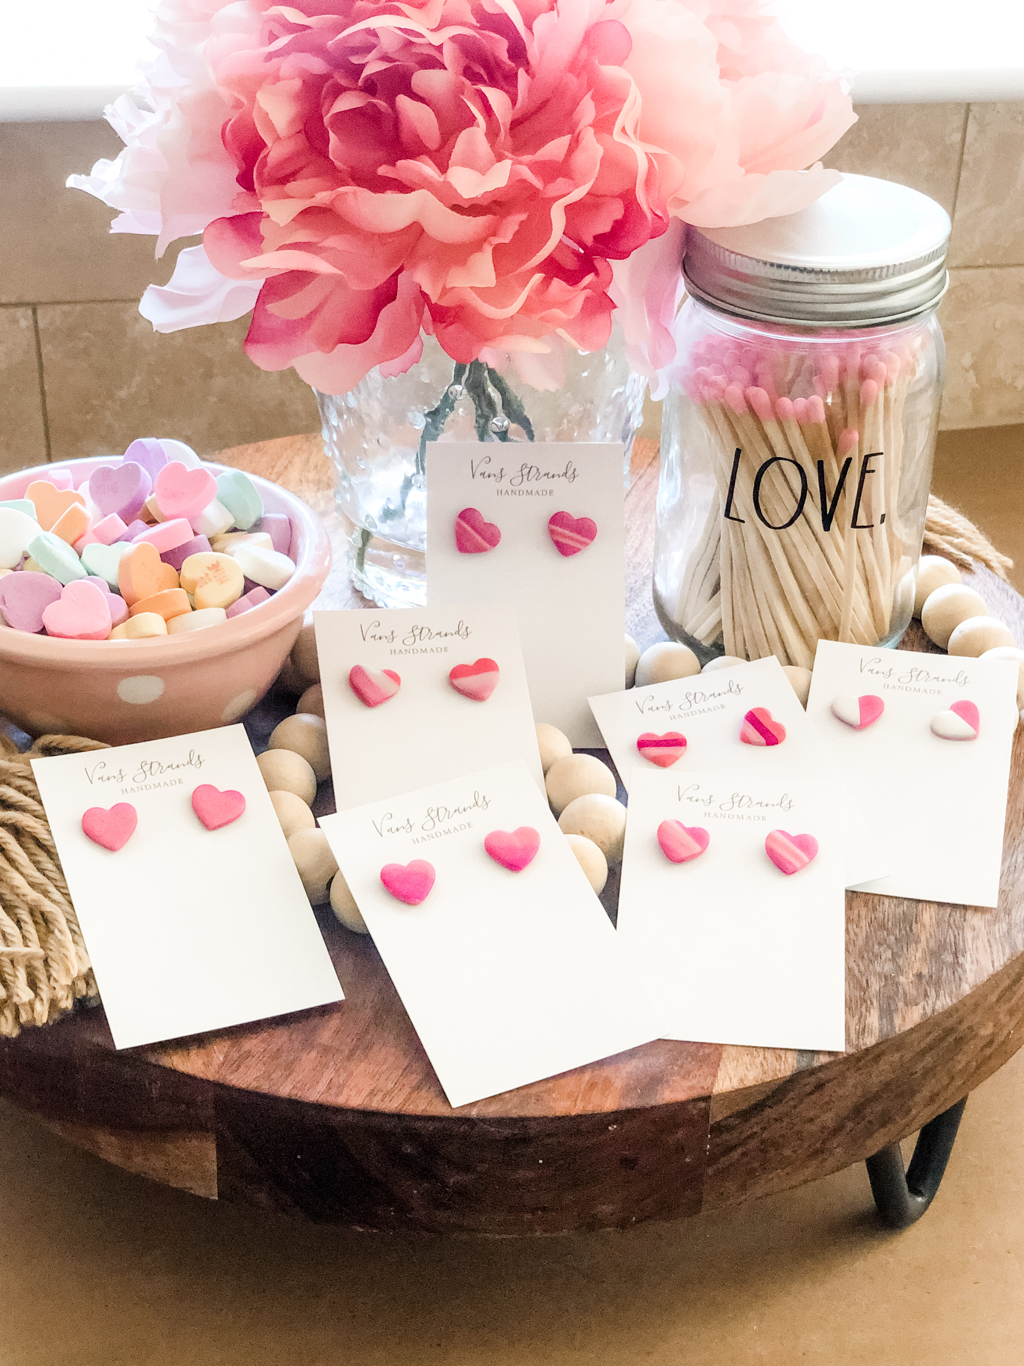 Making clay earrings with my girls has been such a fun activity and distraction during these crazy times. I hope that this DIY helps you to have a little fun and make something beautiful to share with those you love! Supply List:
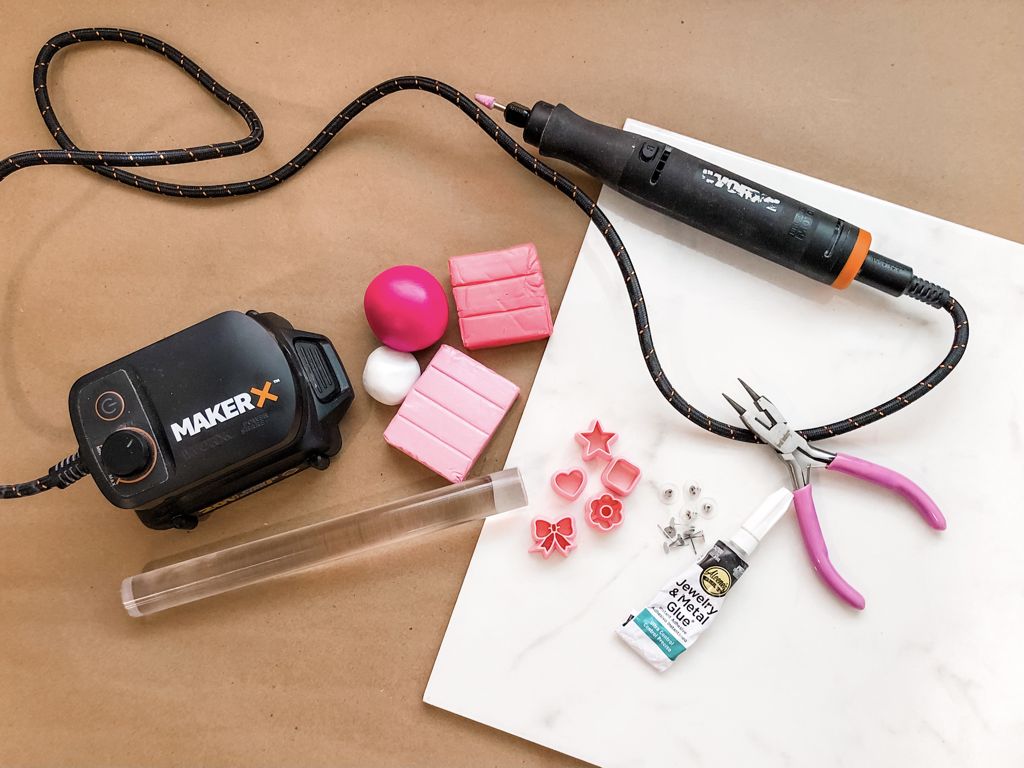 Polymer Clay Earring DIY Step by Step Instructions:
Notes: My girls and I love making earrings together! It is so fun to make accessories that we get to wear and share with our friends. We chose to do a Valentine theme for this tutorial but the options are endless. The clay is sold in a variety of colors and you can even create your own custom colors by mixing the clay together. Let your creativity flow and enjoy your new FABULOUS earrings! 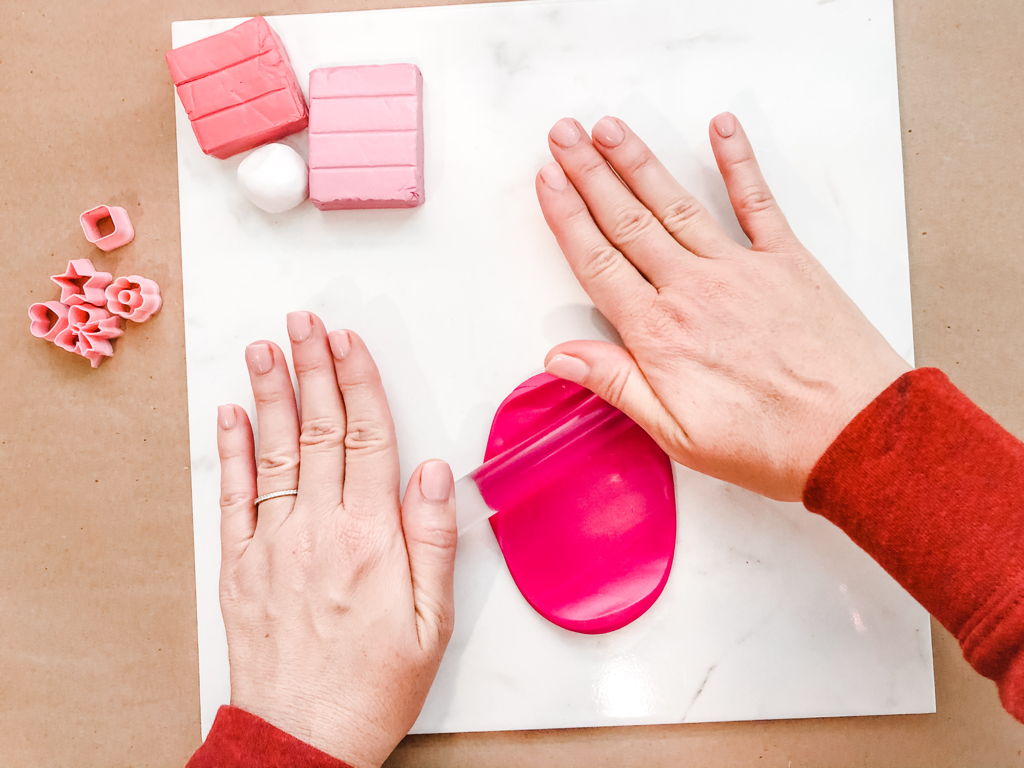 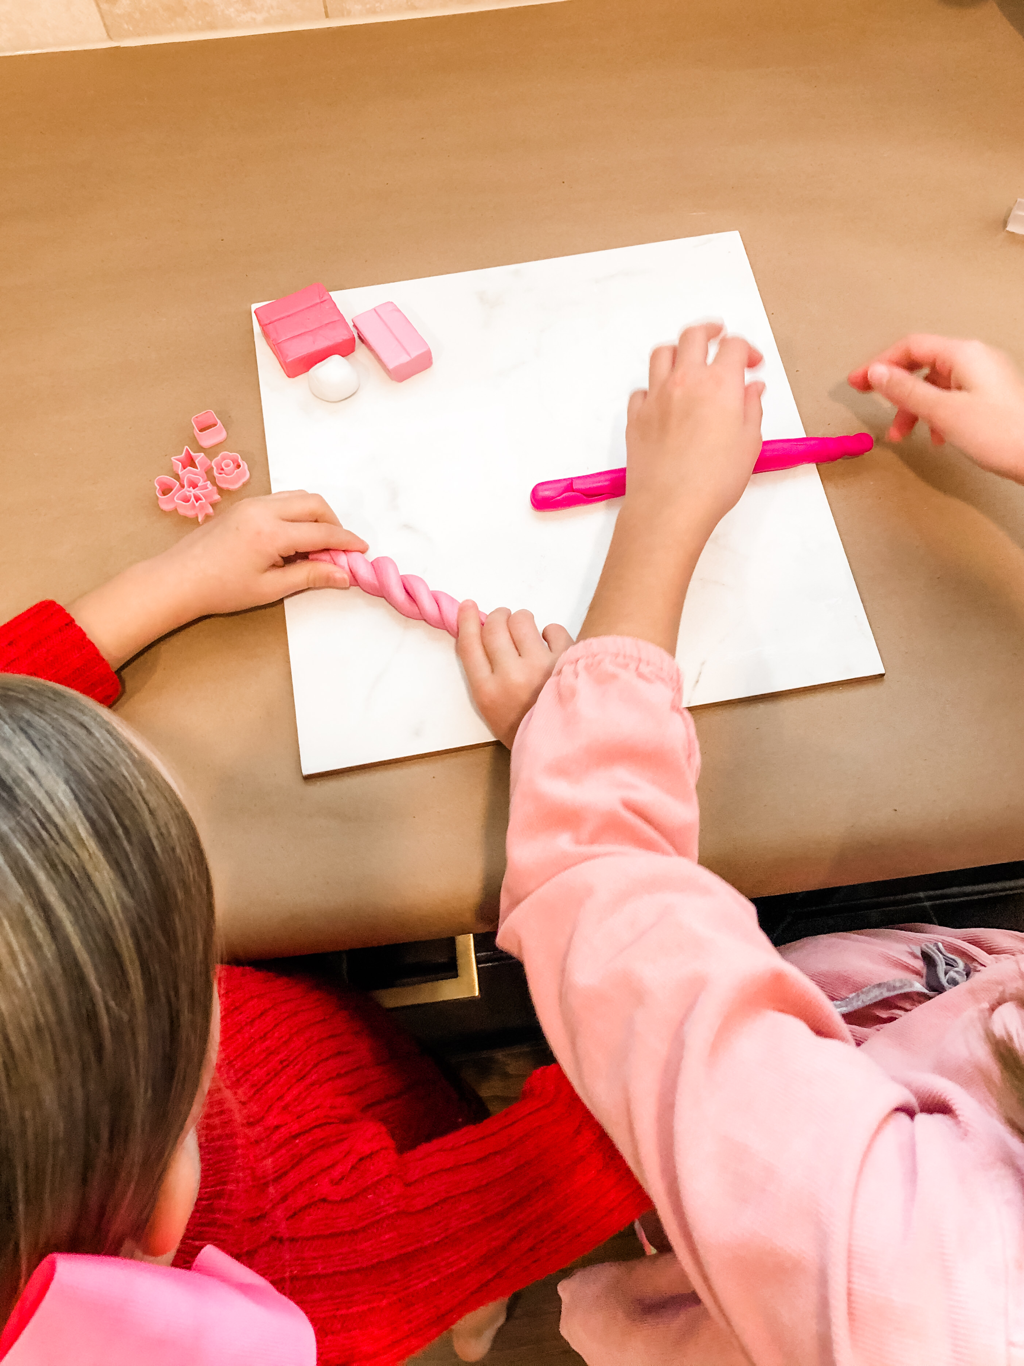 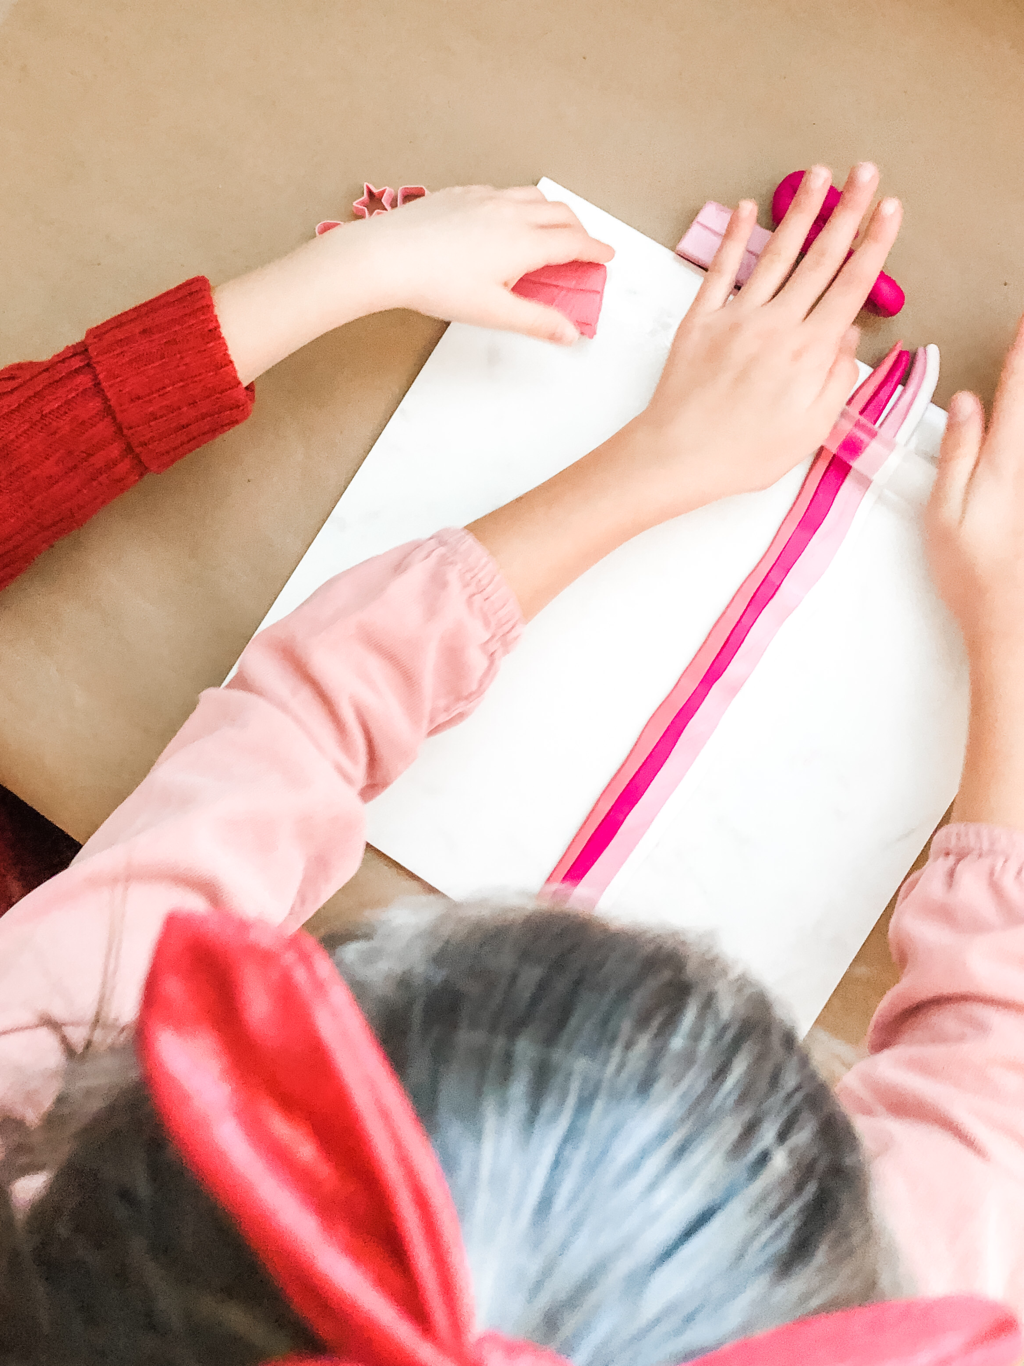 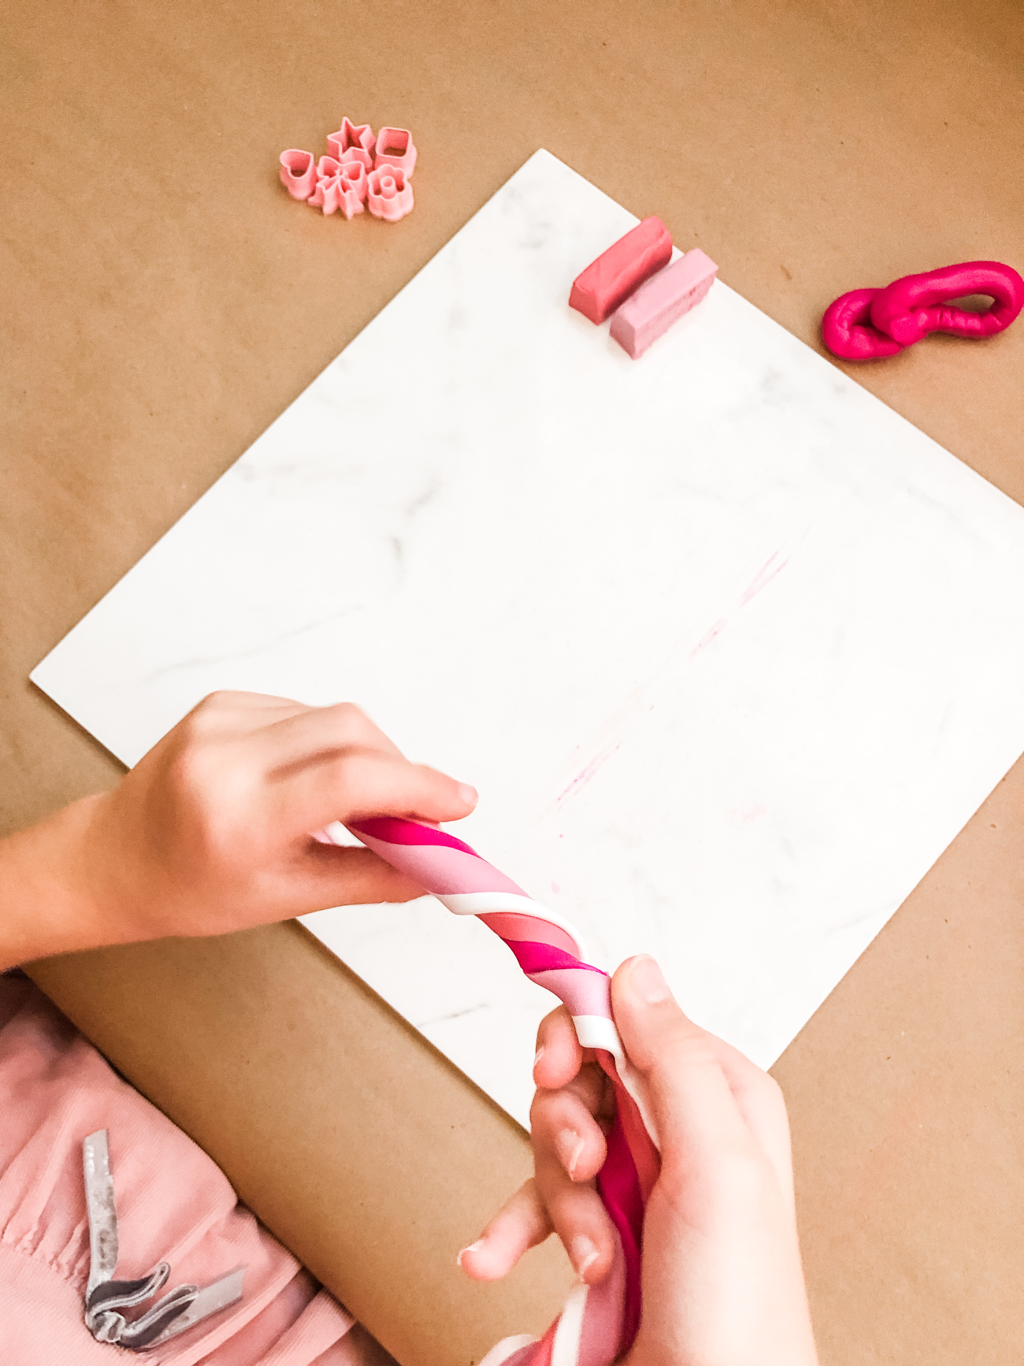 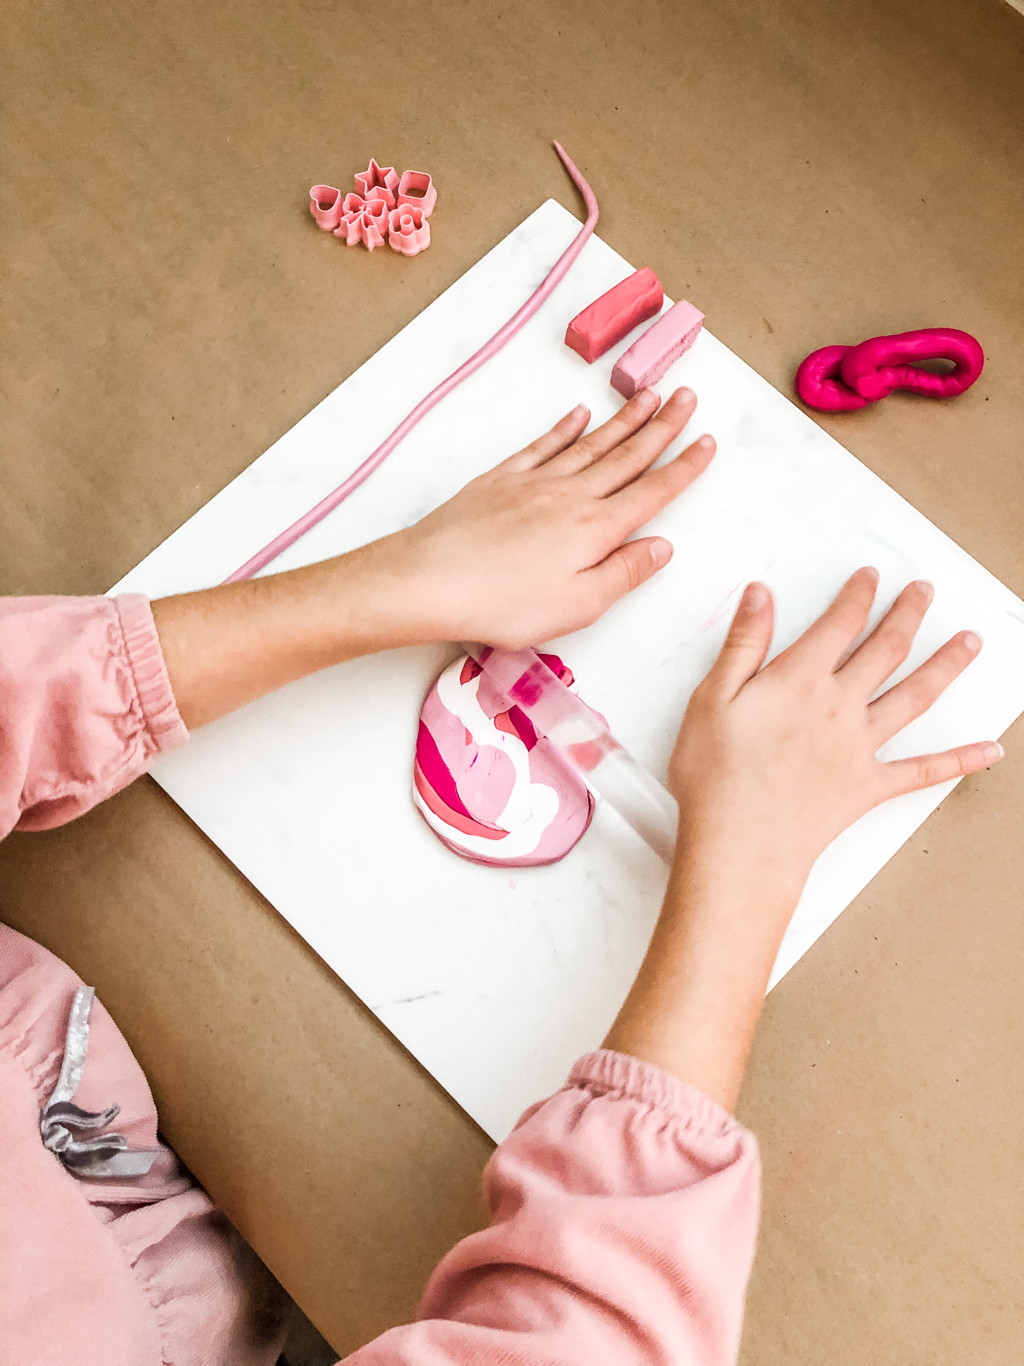 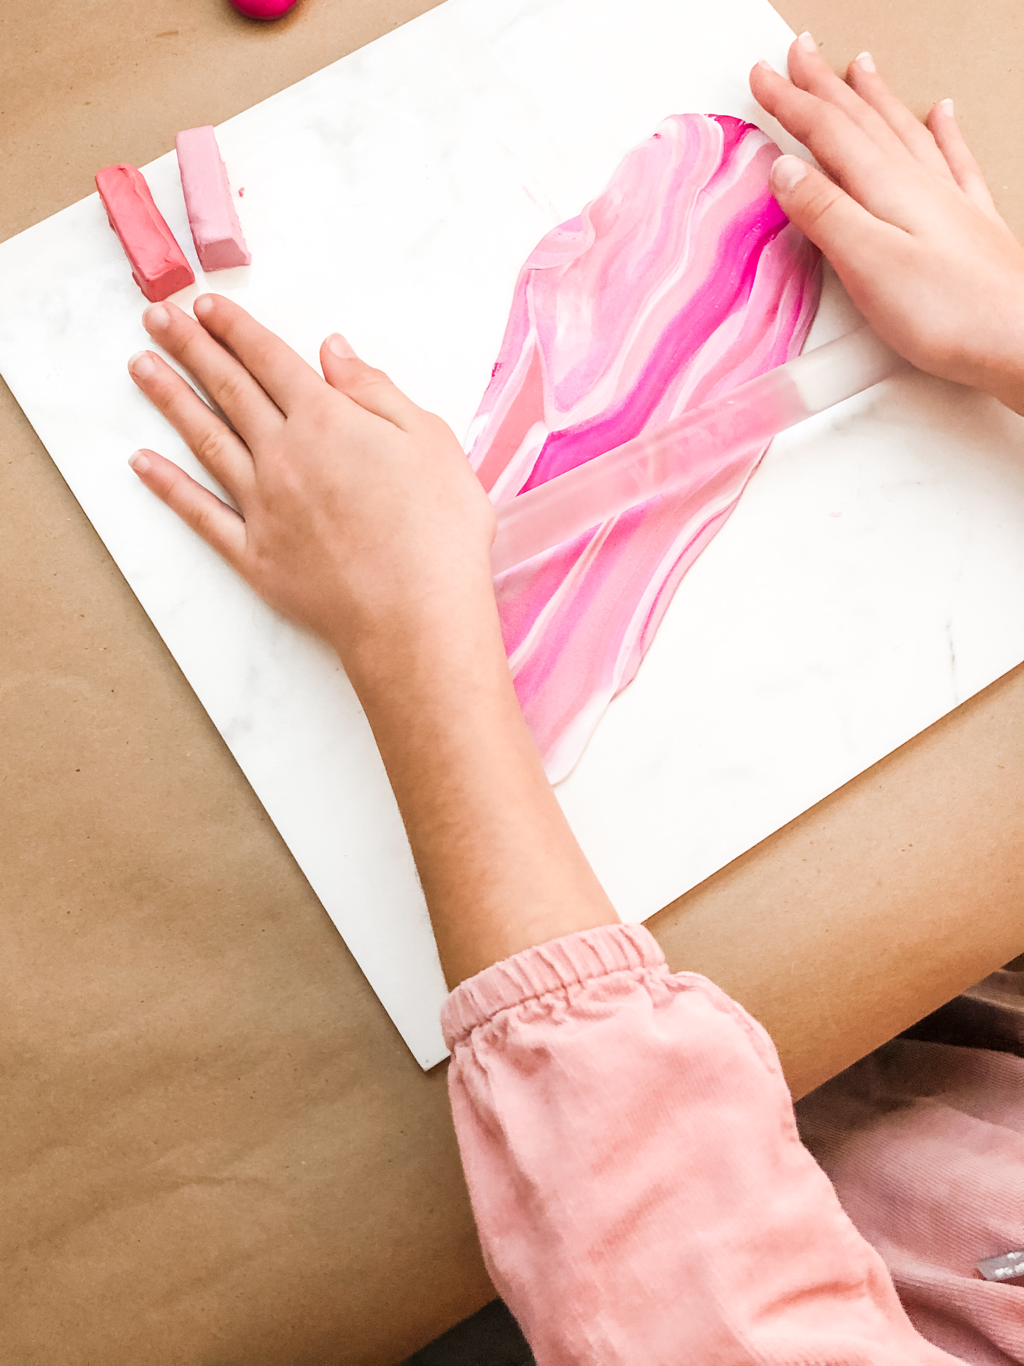 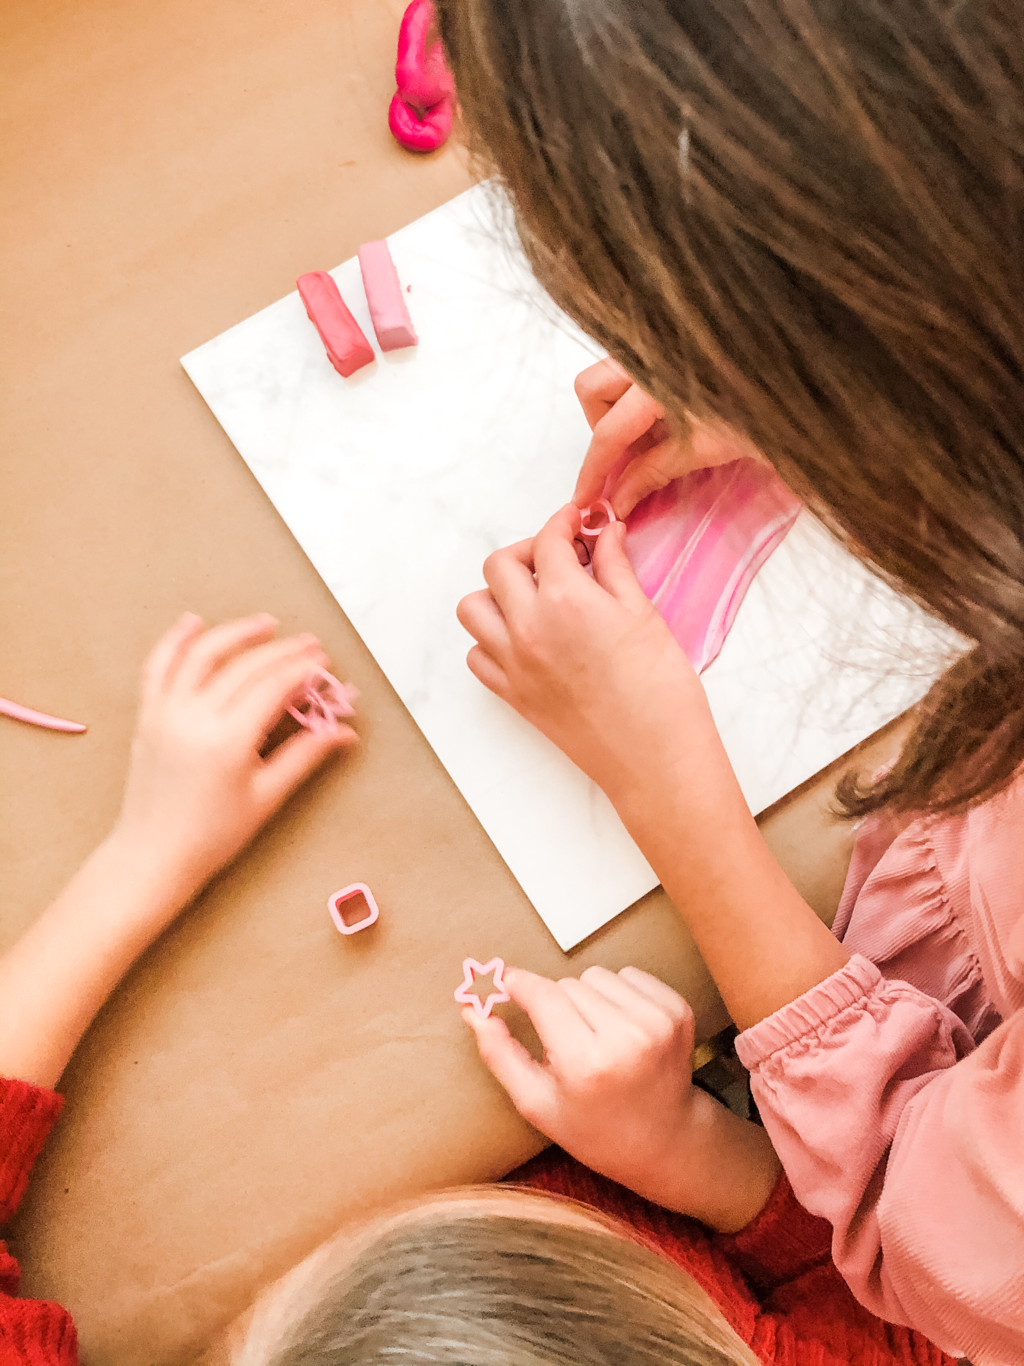 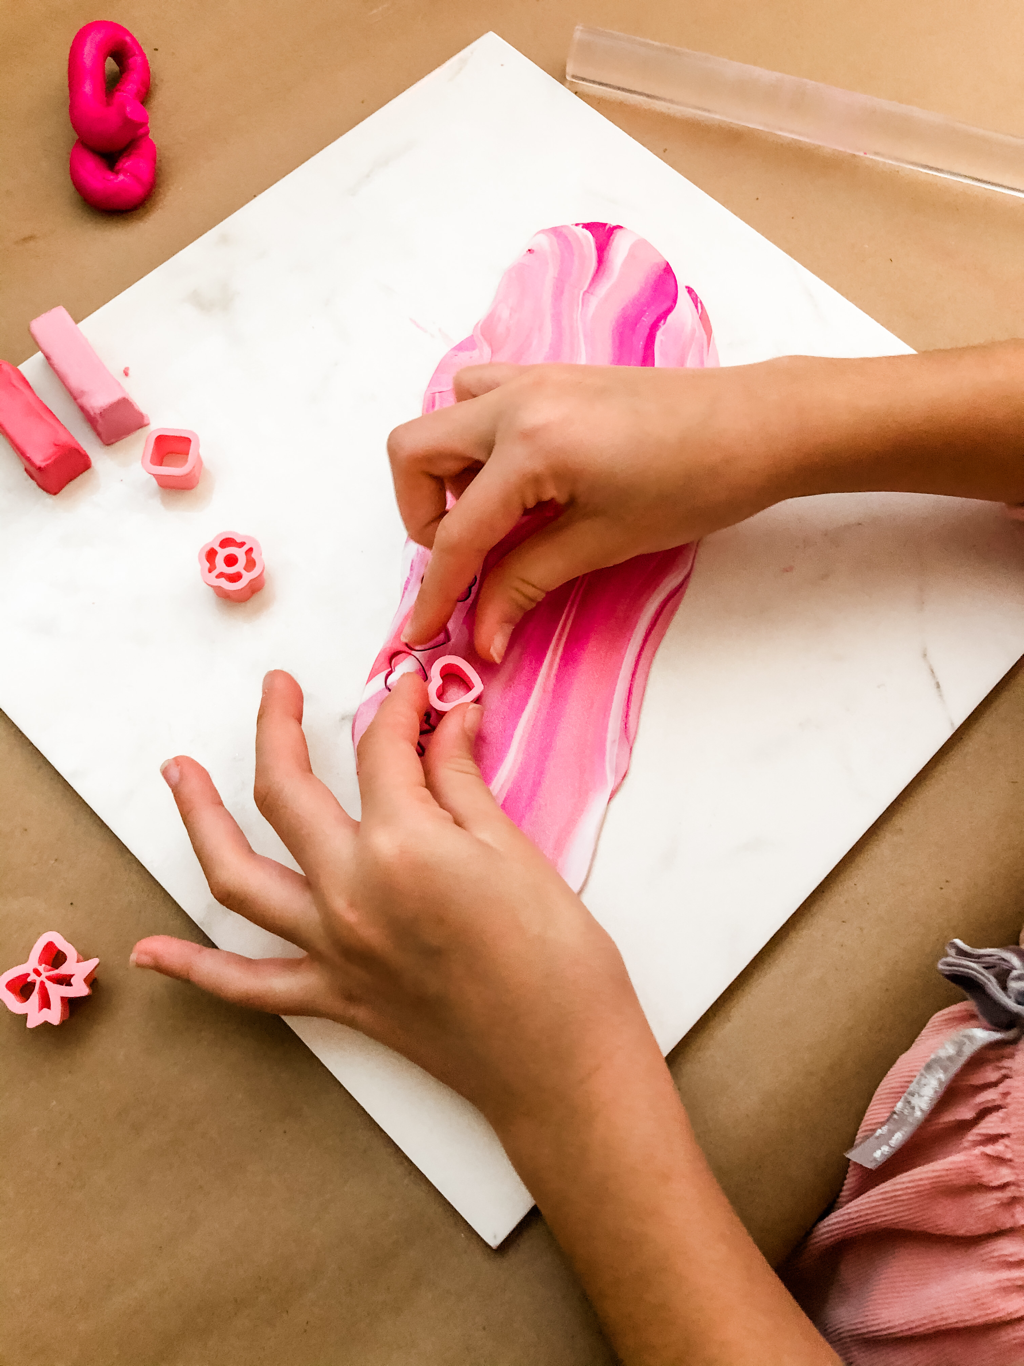 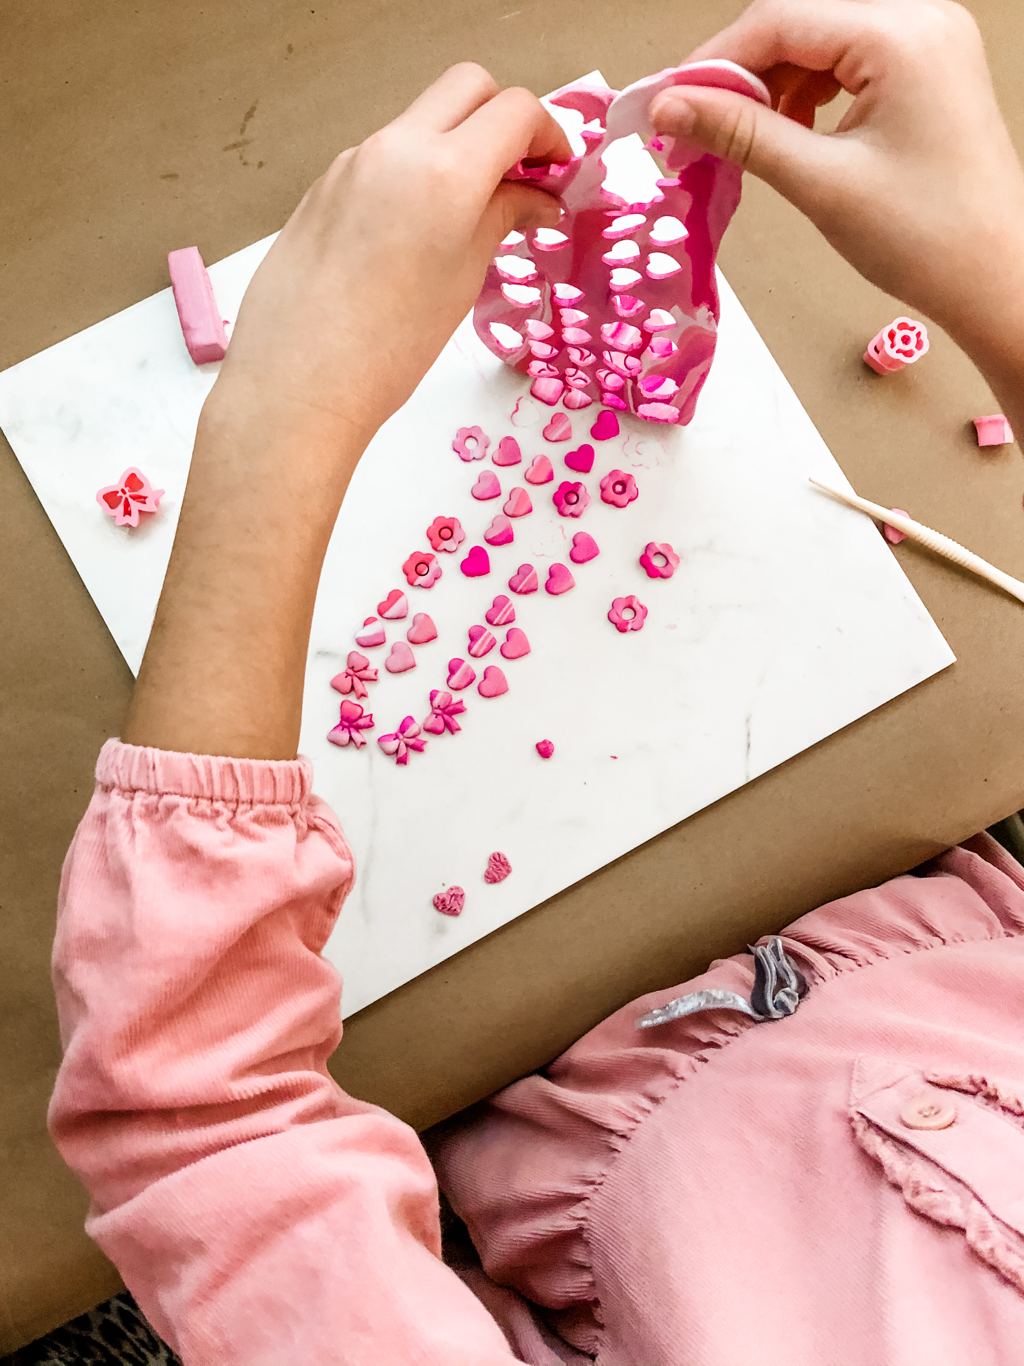 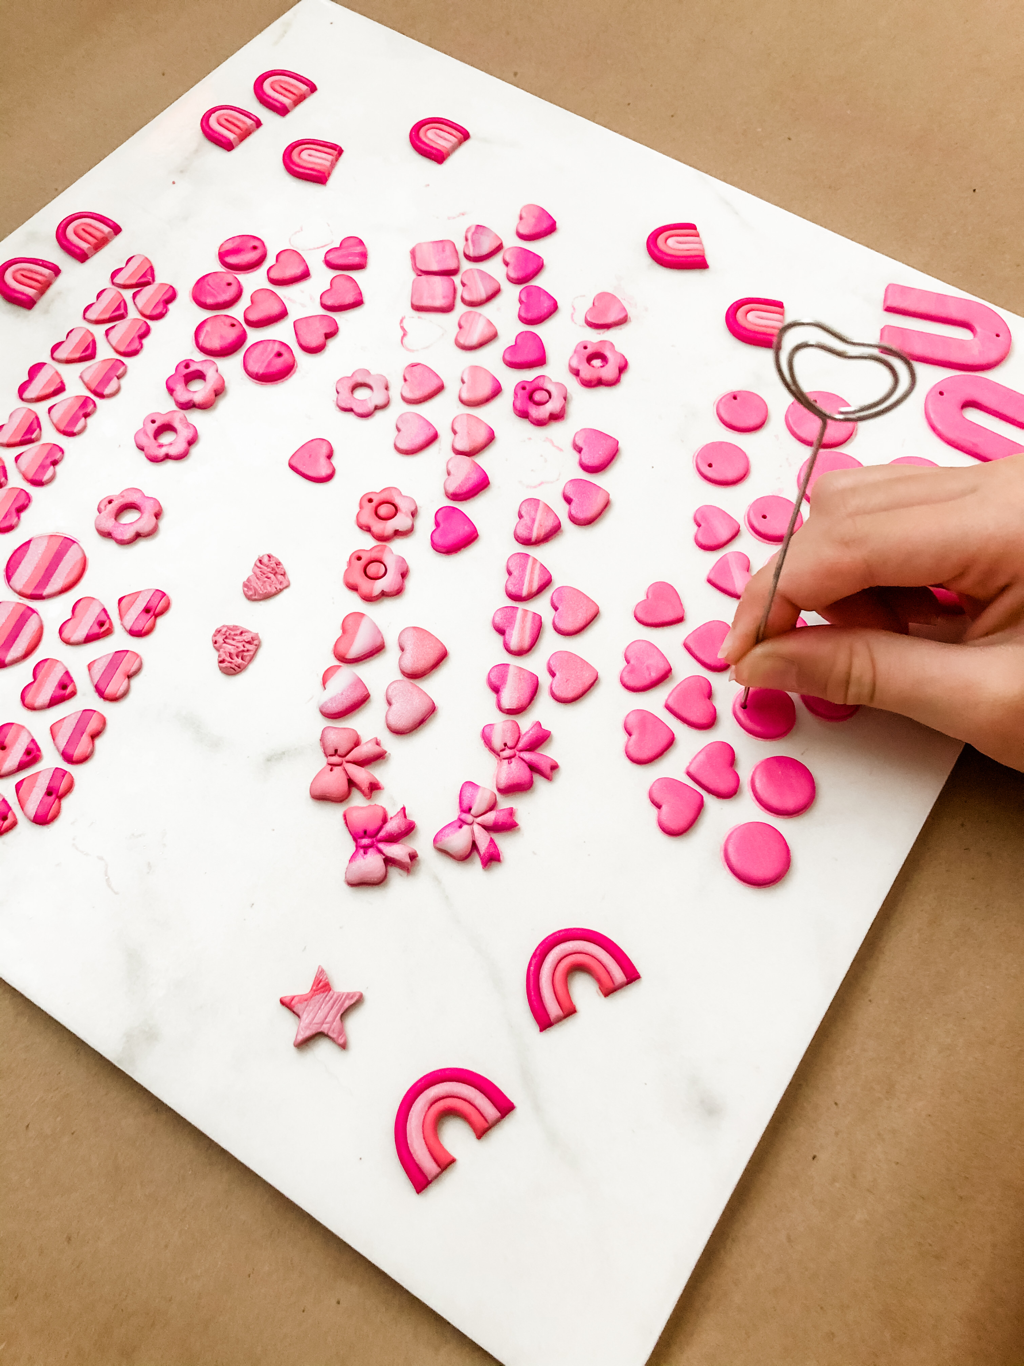 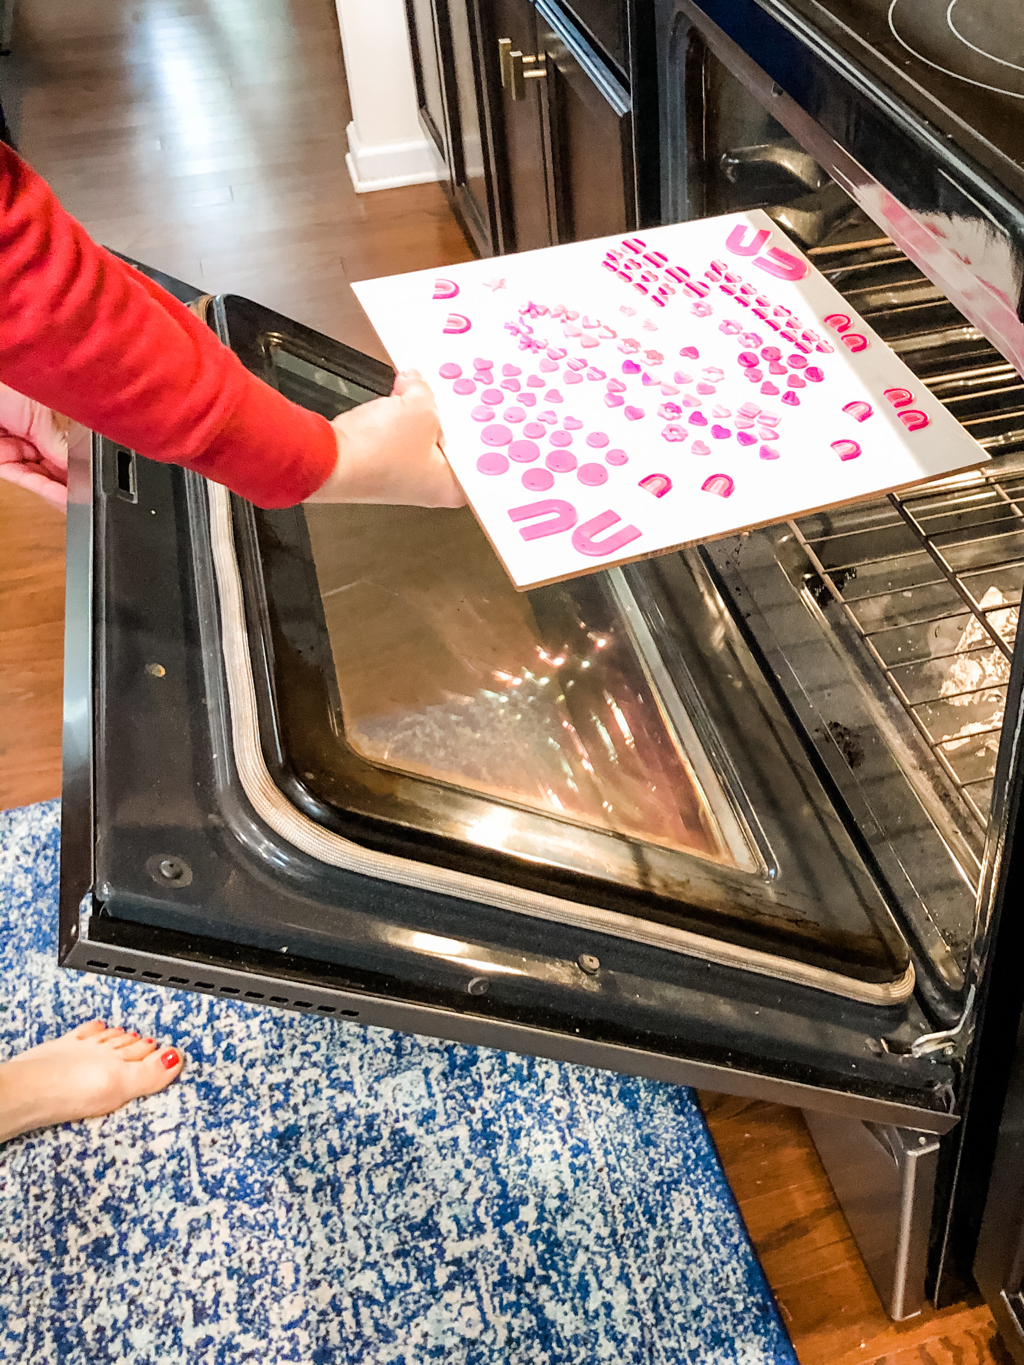 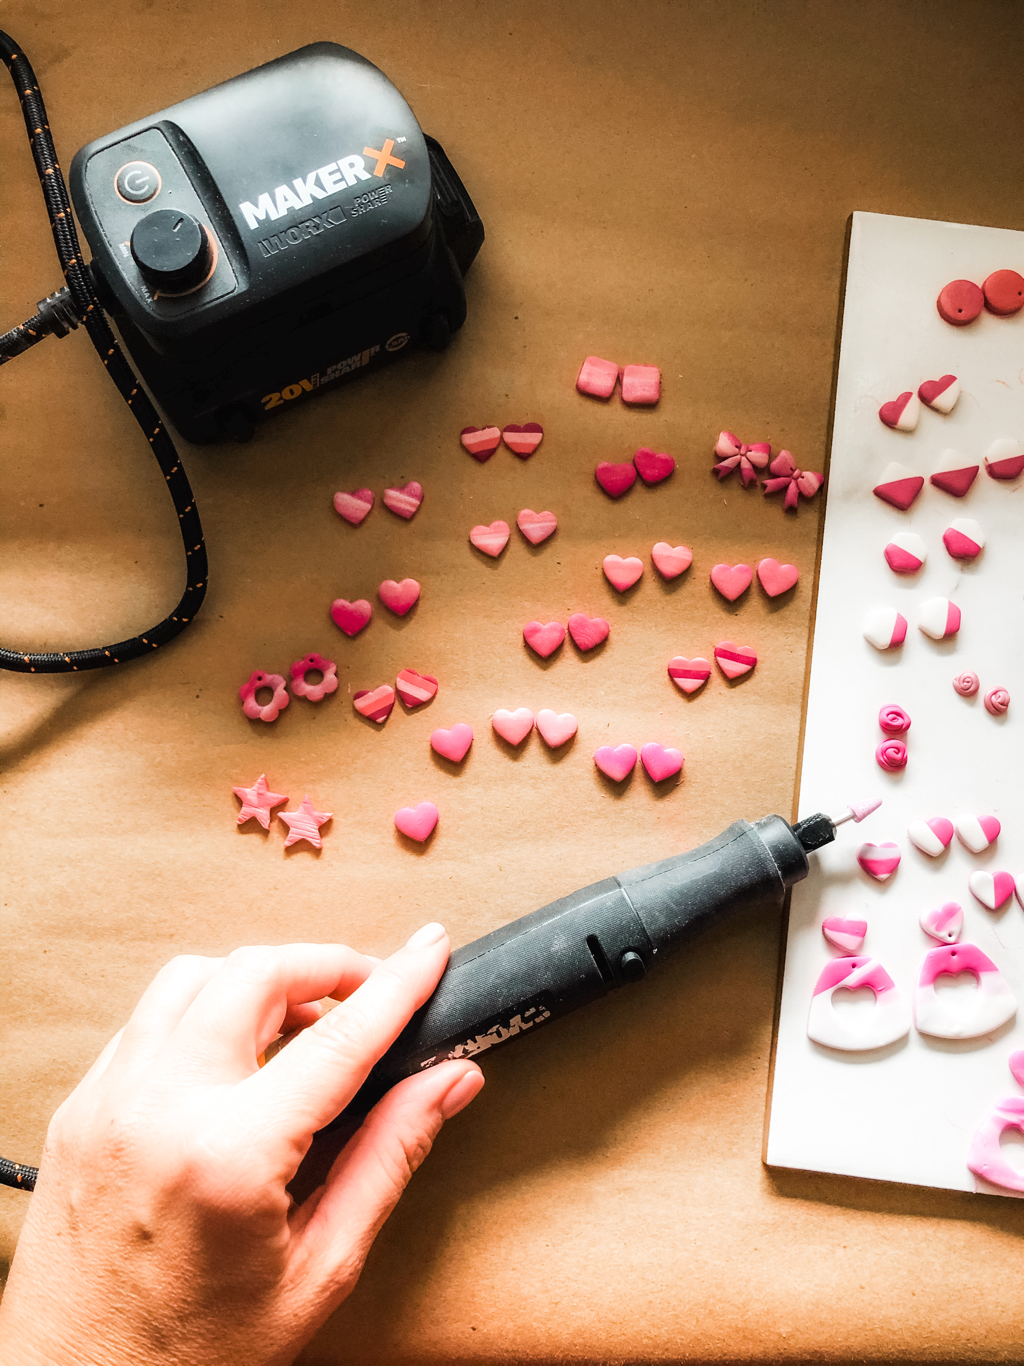 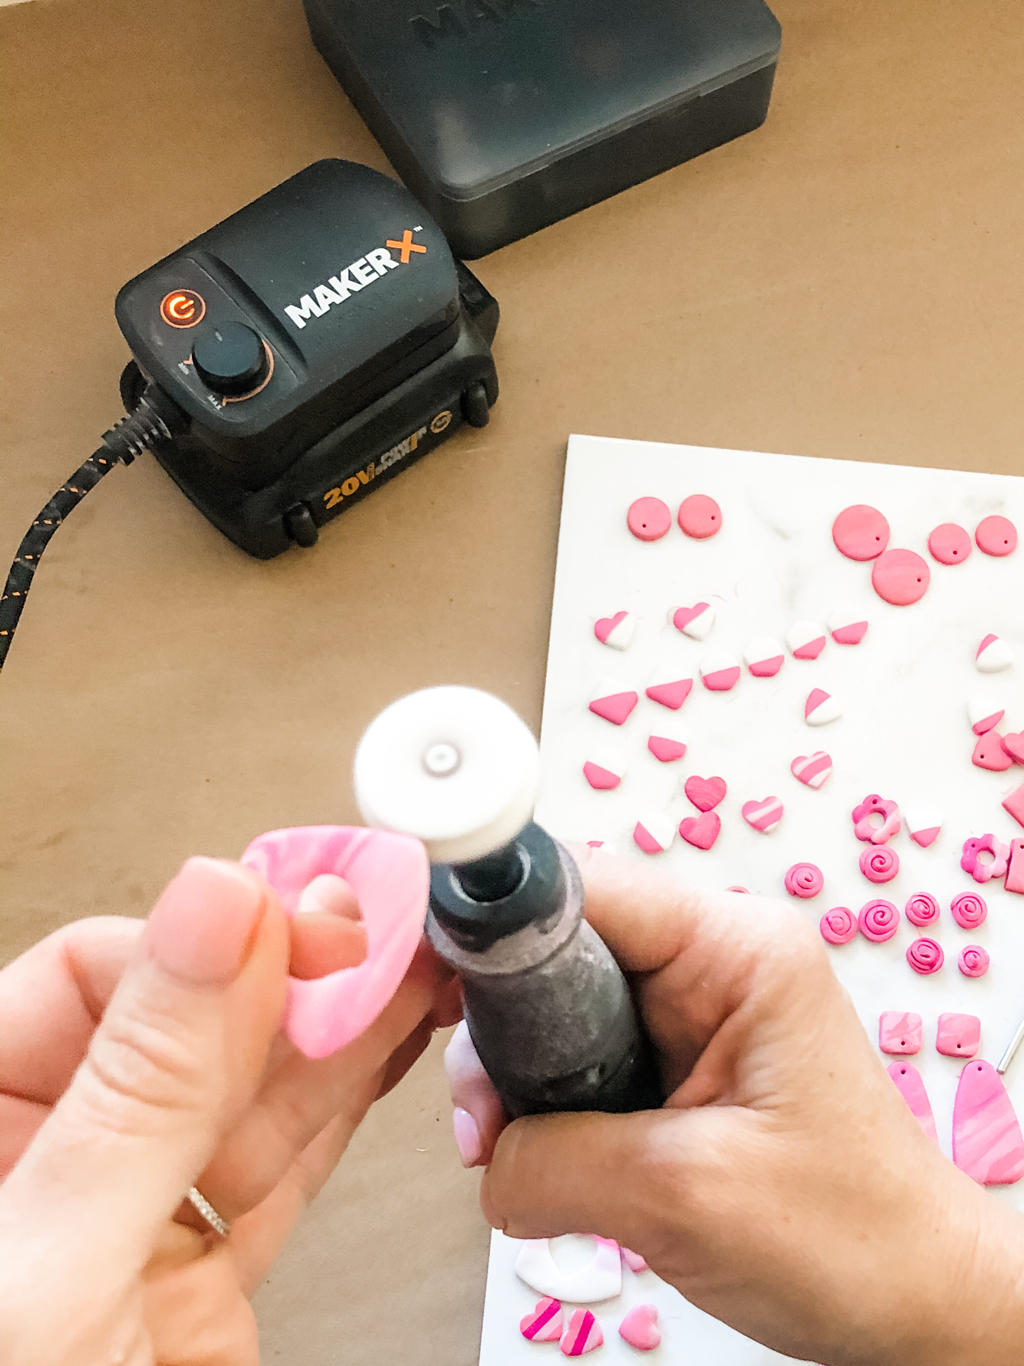 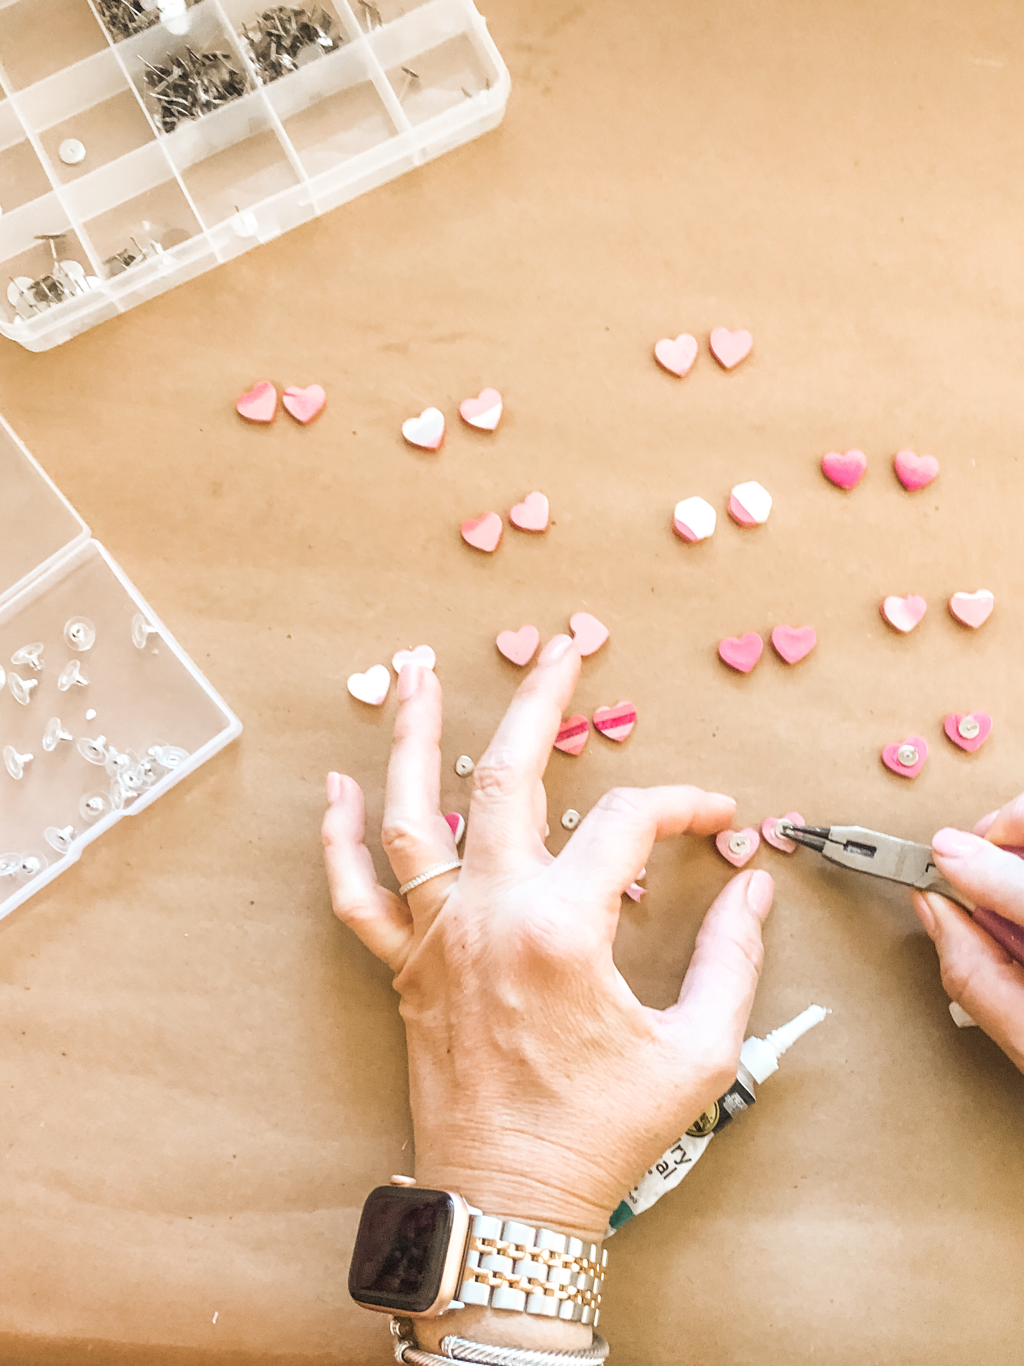 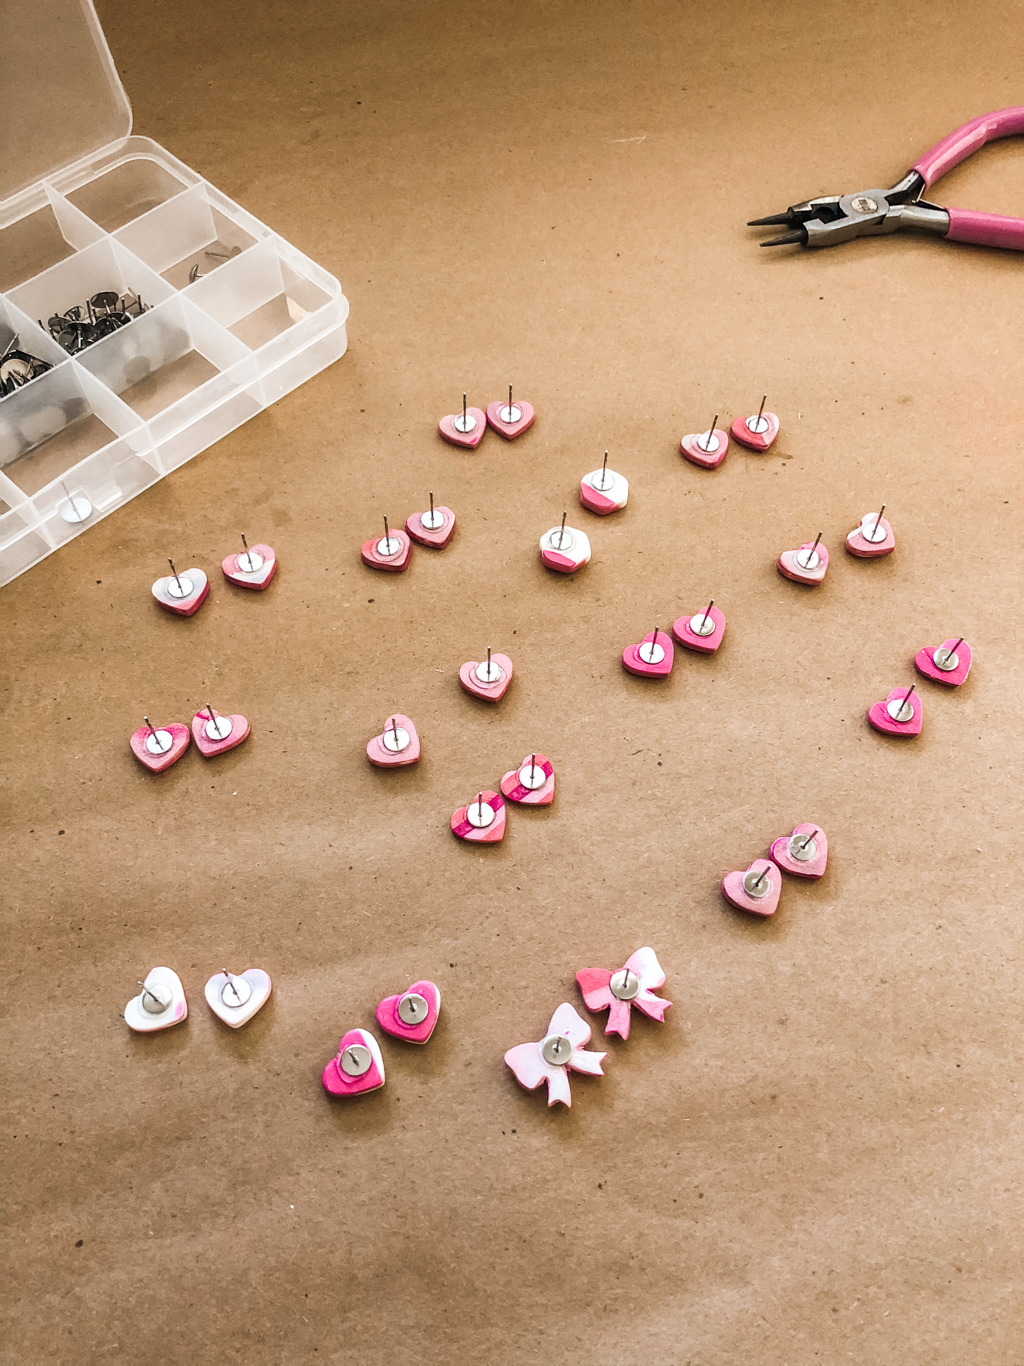 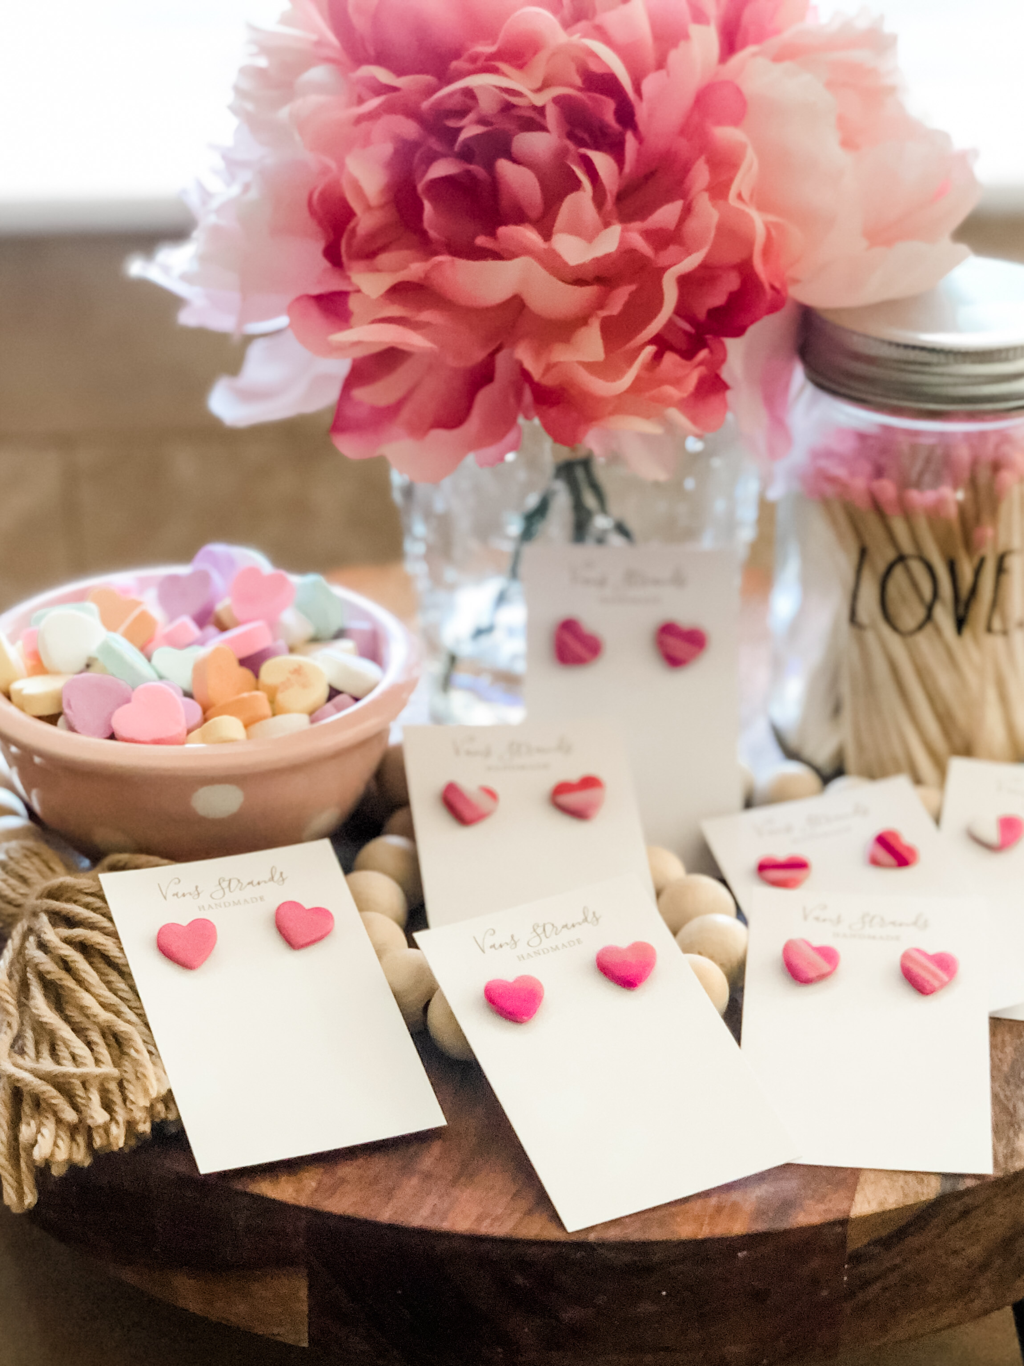  I know, I know, I completely dropped the ball on the blog last year. Life sure knows how to throw a curveball just when you think you're in the groove. After nearly 2 months out of the salon, I have finally decided to give this whole blogger thing another go. How is everyone handling these crazy times? I have definitely had some ups and downs and learned quite a lot about myself in the process. 1. I am definitely not cut out for homeschooling my kids. We have all shed a few tears over e-learning. Not gonna lie. 2. My salon is my happy place. I love being able to spend time there with all of you. 3. Cooking 3 meals a day (plus snacks- WHY ALL THE SNACKS?) is for the birds. 4. I can only do so many crafty things with my kiddos before I lose it. 5. Cleaning my floors has become a daily obsession and therapy. I just don't feel calm if I see footprints. What have you learned about yourself?   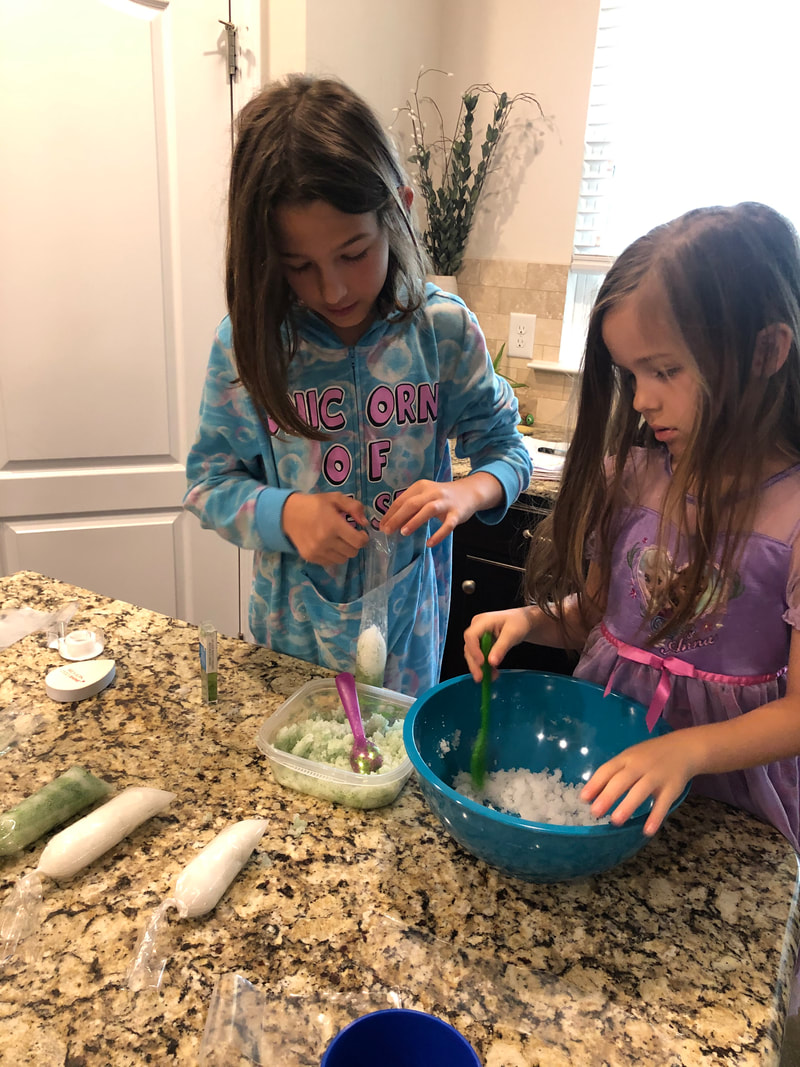 i don’t know about Y’all but my most repeated hairstyle has gotta be the Messy Bun. Praise to all the bloggers and influencers who made it fashionable! It is my go to for weekends getting stuff done around the house, running errands or the occasional “3rd day but I don’t feel like washing it before work” Style.  The Messy Bun, or Top Knot is one of the most versatile upstyles and can literally be worn to workout or to go out. (I love to dress mine up with a statement earring)  In this week’s tutorial I show you 2 different ways to achieve this style. I also add some Pro Tips to make it easy and fun! Whether you are already a messy bun pro or just trying your first one, this video has something for everyone. Let me know what you think in the comments! Don’t forget to subscribe and share! xo- Vans In this week’s video, you will learn some easy tips and tricks to get the perfectly polished blow out in no time!  The most important tip is that you can do a super crazy quick dry to get most of the moisture out and then use your round brush as a styling tool at the end. No sectioning. No clips. No fuss. Happy Styling, lovelies!!
xo- vans Ok guys, Im gonna let you in on a little secret... I have GRAY hair. Like, A LOT of gray hair. (If I grew it out I would look like Cruella Deville, no joke) I got my first one at 21 and they just continue to multiply on the daily, much to my dismay. In our society there is such a double standard when it comes to going gray. When men get a little salt and pepper it makes them sexy (see George Clooney, McSteamy) and when women go gray it makes us a spinster old maid who must live with her parents or have 52 cats. SOOOO NOT FAIR! Even as a hairstylist, I don't want to be coloring my hair every 3-4 weeks. (A'int nobody got time for that!) So, what can you do in between visits to hide those pesky grays??? Let me share a few little tricks with you!  One of the easiest ways to cover those grays in a pinch is to use something I'm sure everyone has... EYESHADOW. Find a matte shadow that is close to (or even a little darker) than your hair color and carefully tap it onto your roots where you part your hair. Finish it off with a little hairspray to set it and you're good to go! Another easy way (and my preferred method) is to use a root touch-up spray. There are a bunch of them popping up on the market (and I have tried a LOT) so I thought I'd share my 2 faves with you. 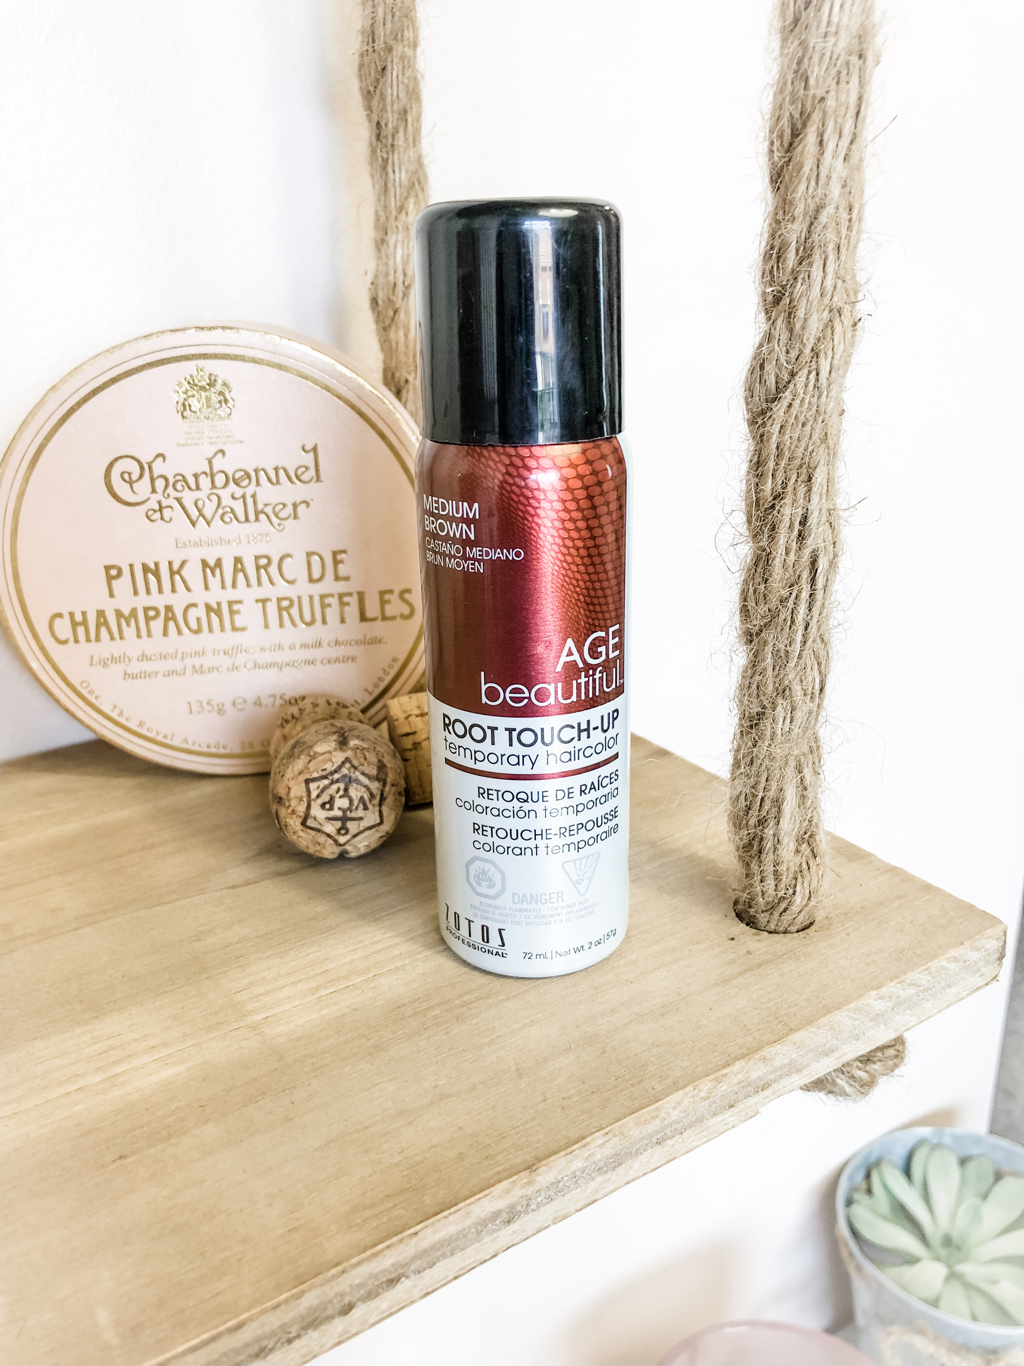 Age Beautiful Root Spray available at Sally Beauty Supply This one is great and is the more affordable option. It has a texture kinda like dry shampoo. The only drawback is that it can rub off a little when you touch it. (Be careful if you wear your sunglasses on your head or you could end up with a brown nose!) ((I speak from experience lol)) 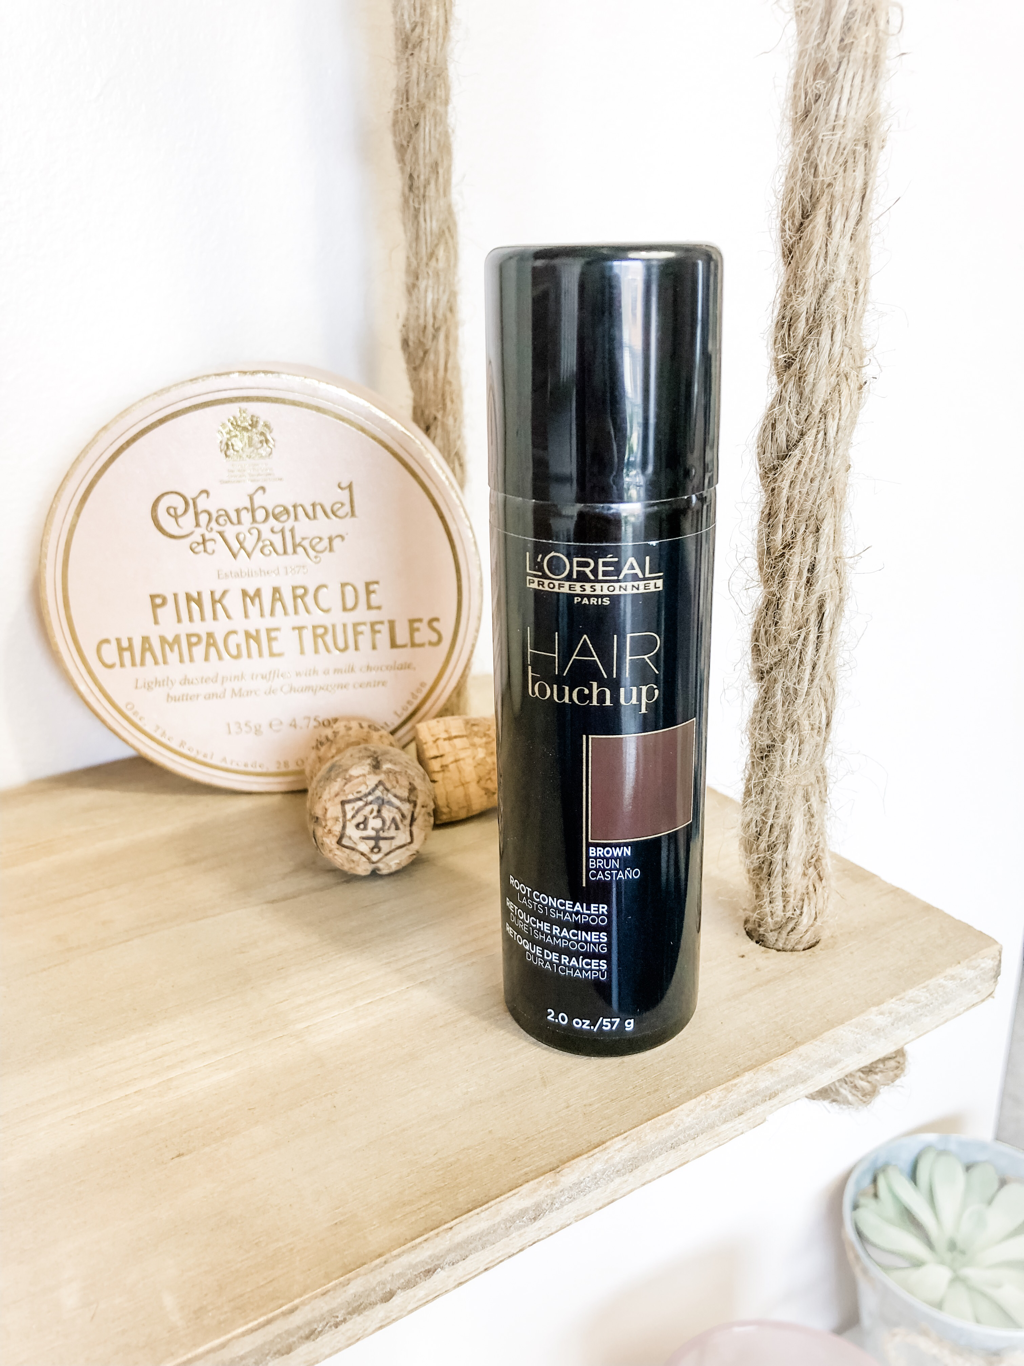 Loreal Professional Hair Touch Up available at Beauty Plus Salon and right now you can get 10% off with code APRIL10 !! This one is hands down my fave. It sprays on a little wet but after it dries it is set and doesn’t rub off as easily. Winning!!! 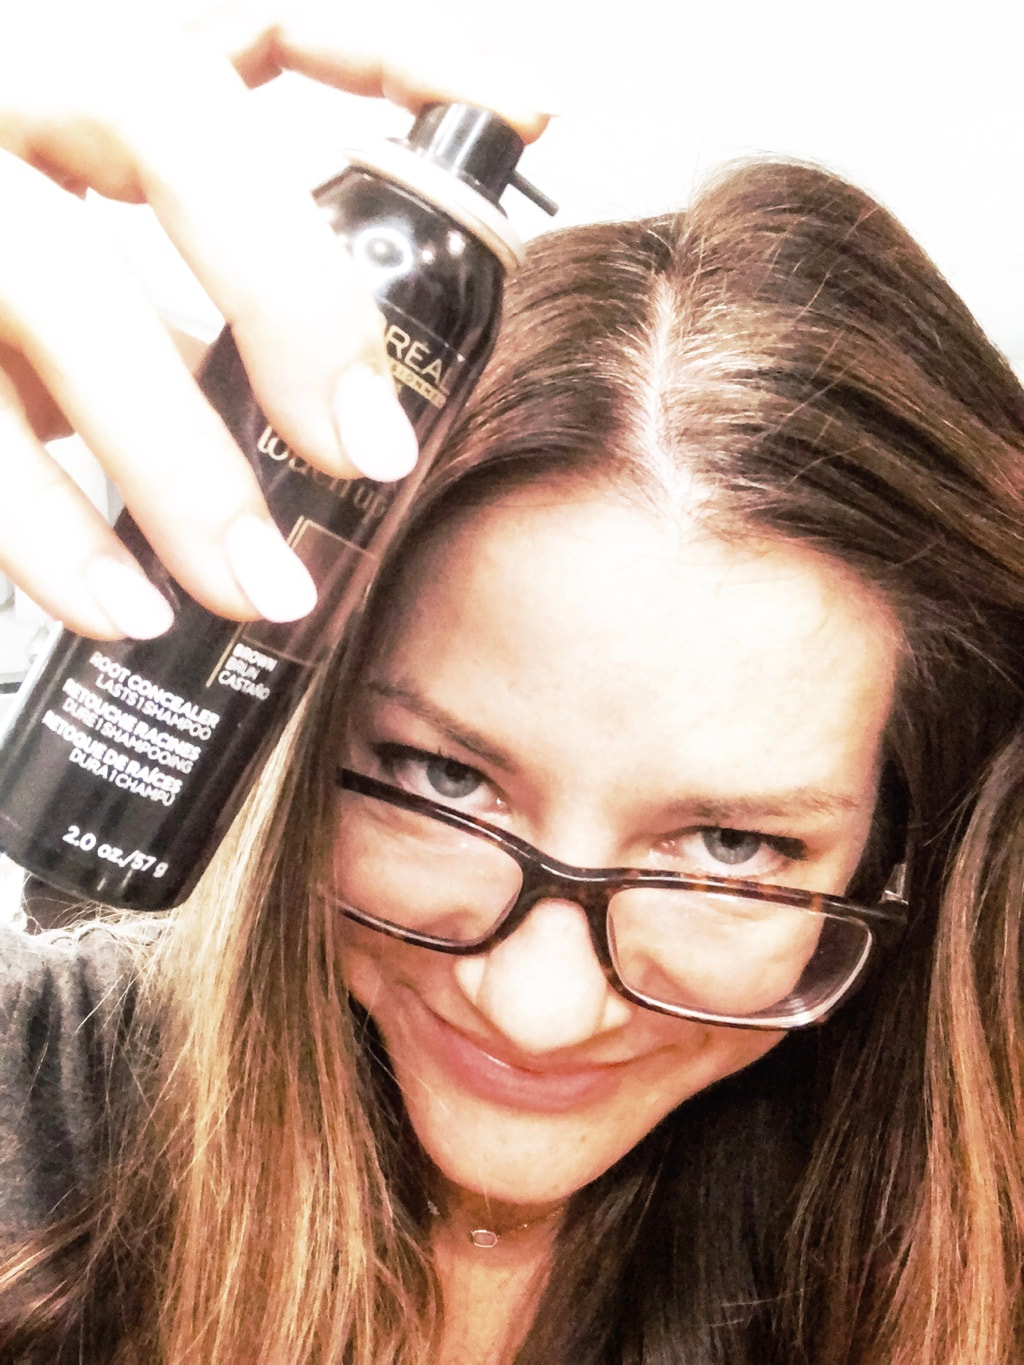 Super super easy! I just style my hair like normal and at the end I lift up each side and spray the roots! (I do one side at a time to avoid getting it on my scalp)  VOILA!! No more gray for the day!!
Hope sharing this little secret of mine will help y’all keep your “natural highlights” a secret too!! xo- vans Side note; please excuse my morning face and specs! 🤓😝 And I’m not talking about dating! This week’s Tutorial Tuesday shows you 5 easy steps to the perfect Faux Fishtail. Super easy and a nice change from that same ole messy bun. This style is SO versatile and could work for running errands in your athletic wear, or you could dress it up for a night out on the town with some statement earrings.  Thank you so much for supporting me and my BIG ideas. I am super excited to be able to share them all with you here. The Hands On Hair by Vans Strands page will be up soon so check back for all the deets and to sign up to host a class! Can’t wait to see all of your beautiful faces and to watch your confidence grow. Happy April! xo- Vans p.s. Please make sure to subscribe to my channel once you click on the video! It’s the best way to stay in the loop when new tutorials come out!
And I wanna see your fishtails!! Be sure to tag @vansstrands or #vansstrands in those perfect hair selfies! With the popularity of pop-up classes and workshops these days you can pretty much learn “how to” do anything. From hand lettering and planting a succulent terrarium to weaving a wall hanging or painting a wooden sign, the possibilities are endless. All of these are excellent hobbies (and kudos to you if you’ve tried them) but how about learning a skill you could use every day? As women, styling our hair is always a priority. Whether it’s trying to master that beachy wave or get the perfect messy bun or to just get those darn bangs to lay right. When your hair looks great, you feel great. One of the most frequent comments i hear in the salon is “I wish you could just come to my house and style my hair every day!” Obviously that’s not realistic (unless you win the lotto and want to put me on salary- then I’d be at your beck and call!) With that being said, I am making it my MISSION to educate women on how to style their OWN hair. Now that’s a skill worth learning!  I realize that the internet is overrun with hair tutorials and I’m sure you’ve even watched a few yourself with little luck. The problem is that watching someone style their hair on video and translating that onto yourself while looking in a mirror is complicated and challenging. You could watch a MILLION beachy wave tutorials but if you are holding your curling iron backwards, it will be a disaster every time. Enter, Hands on Hair. Imagine a night with girlfriends where you can learn how to master that elusive beachy wave together. (SO FUN, Right?!) And that’s not all, with a list of styles to choose from, each class can be customized so you can make sure to learn something you will actually put to good use (no offense succulent planters and basket weavers).  With an arsenal of awesome Vans Strands tips and tricks under your belt, I know that you can truly make every day a GOOD HAIR DAY! So, in honor of the Official Launch of Hands on Hair I am doing a tutorial every Tuesday! (wait, didn’t she just say that these tutorials don’t work?) I know, I know… My plan is to keep the tutorials here on the website and on my YouTube channel so that you can go back and reference them after you’ve attended a class! That way if you get stuck at home you can check back for a refresher anytime. Happy Inaugural #HANDSONHAIR #tutorialtuesday!! xo- Vans (*Please bear with me as I figure all of this out and excuse my awkward tendencies lol)
Make sure to subscribe to my channel so you can stay up to date with all of the new #tutorialtuesday videos coming at ya! I’m sure y’all are just as excited as I am that it is officially spring! Warm weather and sunny skies make me happier than almost anything. (Byeeeeee seasonal depression!) Buuut, now is the time of year that you never know what the temp is gonna be and dressing becomes a major challenge. It’s freezing in the morning but basically summer by midday. So, what the heck do you wear??!?!! I struggle with this on the daily and layers are obviously the key. My go to layering piece this year has been my fave jean jacket. They are so versatile and literally go with anyythiiing. What are your favorite layering trends? 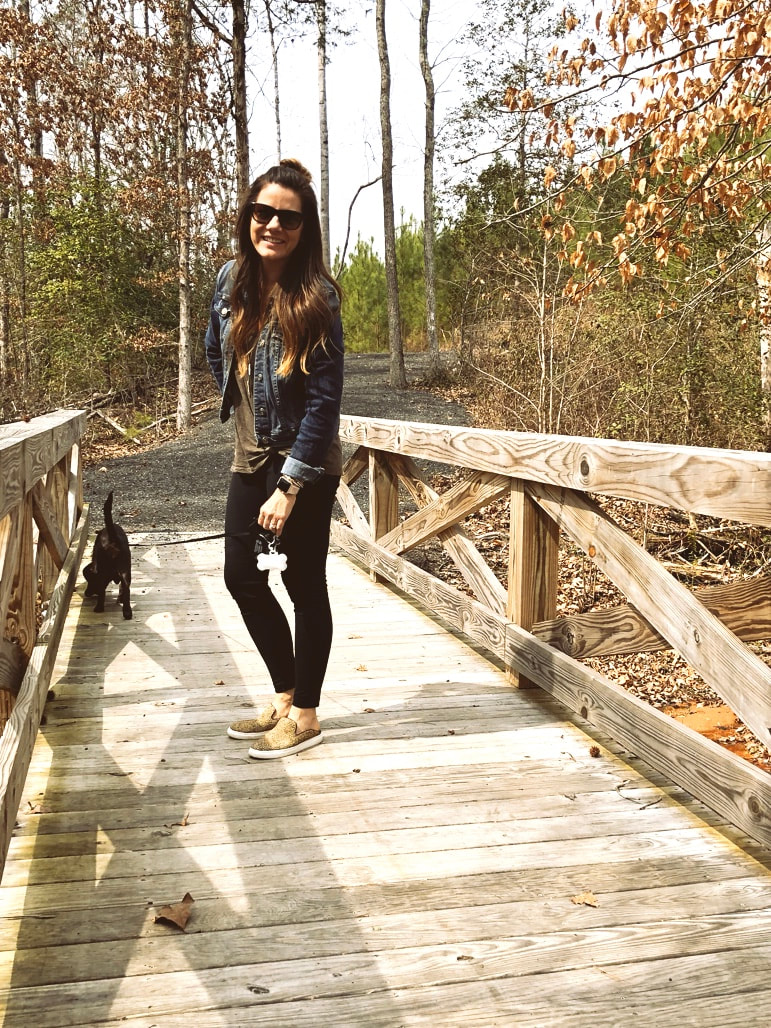 Another Spring wardrobe challenge is whether or not to bust out all the bright spring colors or stay neutral. Here I opted for neutral and this outfit is oh so comfy! 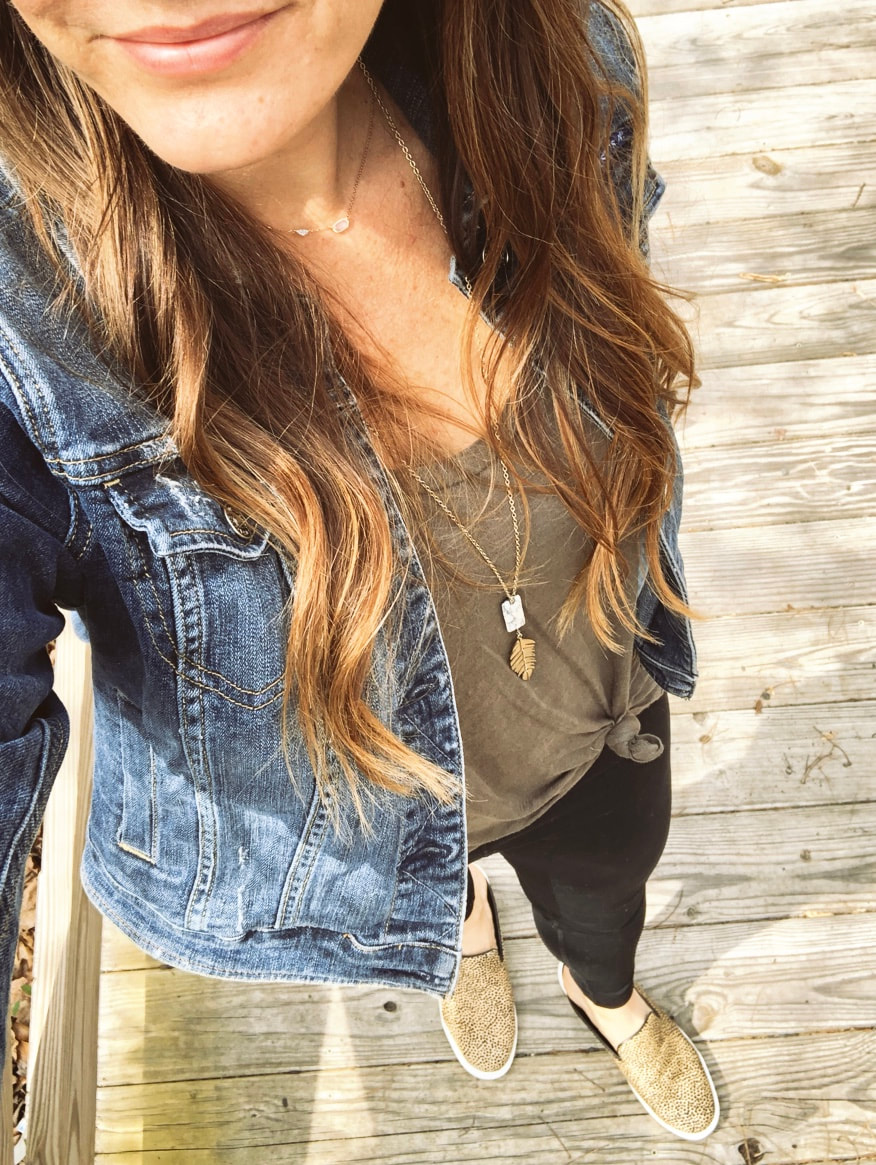 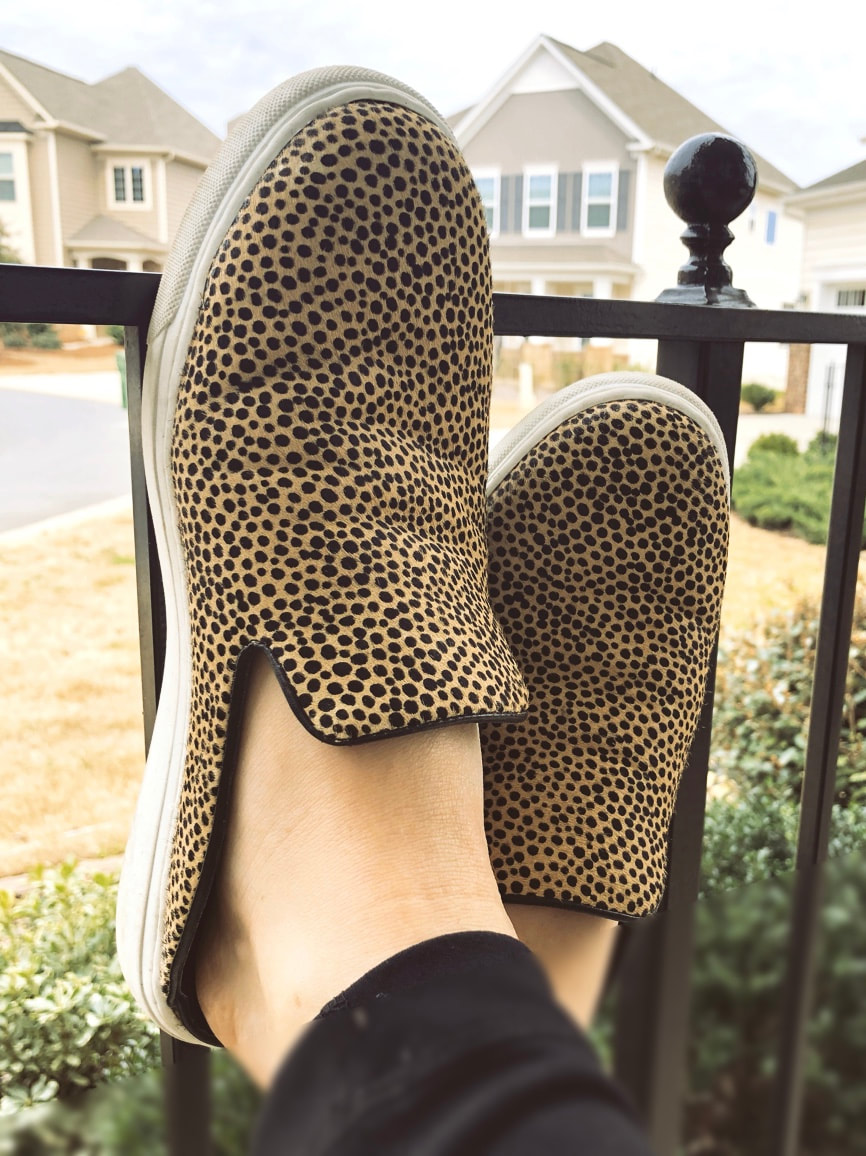 These Sole Society mule sneakers are my FAVE! So comfortable and easy to slip on for a quick walk. (And the animal print is adorbs. They go with anything!) https://www.solesociety.com/belynda3.html 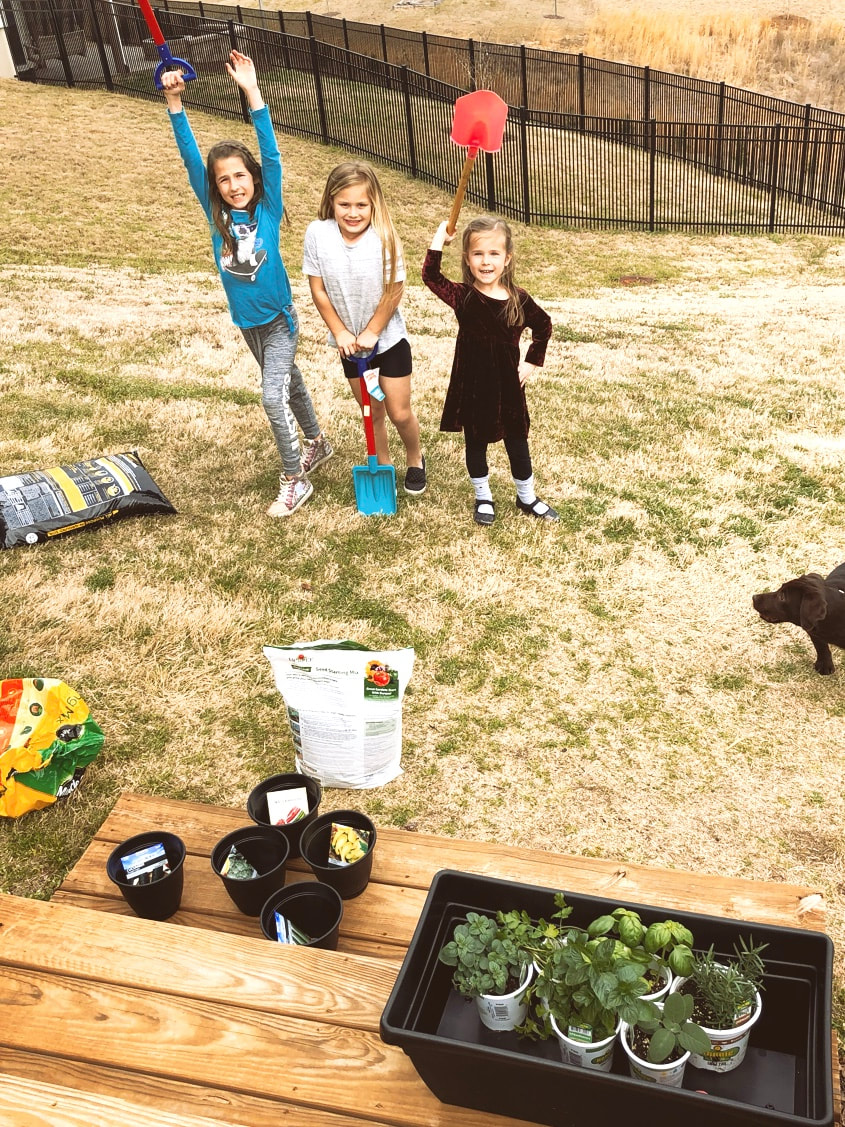 The girls and I celebrated the first day of spring with some new plants and flowers! How did you celebrate?
After YEARS of saying, “I should start a blog.” I am finally taking the leap and I am so excited to share all of my fun ideas with y’all! I am planning to have content including fashion, lifestyle, fitness, hair tutorials, crafts and decor amongst other little tidbits on life in general. Hope you are as excited as I am! Feel free to send me some feedback about what you’d like to hear!  |
AuthorVanessa Schmitz is the owner of Vans Strands, a salon located in Charlotte, NC. A mommy of 2 amazing daughters, a Wife and a perpetual optimist. Caffeine junkie. Serial crafter. Yogi. Lover of all things fashion, food and fun.
Archives
May 2020
Categories |
 RSS Feed